
Introduction
Welcome to the HyperAdX Integration and API documentation!
Native ads
HyperAdX uses Placement ID to allow access to the API. You can register a new App and create Placement at our developer portal.
Native Ads in Mobile Web
- Go to the Publisher UI
- Create new App
- Create new Placement for it
- On placements list click on Tag & SDK and select appropriate integration.
Native Ads in iOS
The HyperAdX’s Native Ads allows you to build a customized experience for the ads you show in your app. When using the Native Ad API, instead of receiving an ad ready to be displayed, you will receive a group of ad properties such as a title, an image, a call to action, and you will have to use them to construct a custom UIView where the ad is shown.
There are three actions you will need to take to implement this in your app:
- Request an ad
- Use the returned ad metadata to build a custom native UI
- Register the ad’s view with the
HADNativeAdinstance
Set up the SDK
Follow these steps to download and include it in your project:
- Download latest release and extract the HADFramework for iOS.
- Open your project target General tab.
- Drag the HADFramework.framework file to Embedded Binaries.
- Open your project target Build Settings tab. (Required only for Objective-C projects)
- Set “Embedded Content Contains Swift Code” to Yes. (Required only for Objective-C projects)
- Add the AdSupport framework to your project.
iOS 7
If you want to support iOS7 - download our legacy SDK. It supports only NativeAds.
Swift implementation
Now, in your View Controller implementation file, import the SDK and declare that you implement the
HADNativeAdDelegateprotocol as well as declare and connect instance variables to your Storyboard or .XIB:
import HADFramework
class MyViewController: UIViewController, HADNativeAdDelegate {
    @IBOutlet weak var bannerView: UIView!
    @IBOutlet weak var imageView: HADMediaView!
    @IBOutlet weak var iconView: HADMediaView!
    @IBOutlet weak var titleLabel: UILabel!
    @IBOutlet weak var descLabel: UILabel!
    @IBOutlet weak var cta: UIButton?

    var nativeAd: HADNativeAd! = nil

}
Then, add a method in your View Controller’s implementation file that initializes
HADNativeAdand request an ad to load:
override func viewDidLoad() {
    super.viewDidLoad()
    nativeAd = HADNativeAd(placementId: "PLACEMENT_ID", content: [.Title, .Description, .Banner, .Icon], delegate: self)
    nativeAd.loadAd()
}
You may set
contentparam on HADNativeAd initialization to get only needed properties. If you didn’t setcontentparam then you get all properties.
to get title text
.Title
to get description text
.Description
to get banner
.Banner
to get icon
.Icon
Now that you have added the code to load the ad, add the following functions to handle loading failures and to construct the ad once it has loaded:
//MARK: HADNativeAd Delegate
func HADAd(nativeAd: HADNativeAd, didFailWithError error: NSError) {
    print("ERROR: \(error.localizedDescription)")
}

func HADNativeAdDidLoad(nativeAd: HADNativeAd) {
    imageView.loadHADBanner(nativeAd, animated: true) { (error, image) in
            if error != nil {
                print("ERROR: CAN'T DOWNLOAD BANNER \(error)")
                return
            }
            print("BANNER DOWNLOADED")
    }
    iconView.loadHADIcon(nativeAd, animated: true) { (error, image) in
            if error != nil {
                print("ERROR: CAN'T DOWNLOAD ICON \(error)")
                return
            }
            print("ICON DOWNLOADED")
    }
    titleLabel.text = nativeAd.title
    descLabel.text = nativeAd.desc
    cta?.setTitle(nativeAd.cta, forState: .Normal)
}

func HADNativeAdDidClick(nativeAd: HADNativeAd) {
    print("CLICKED AD")
}
Handle click on your implementation of “call to action” button
@IBAction func adClicked() {
    nativeAd.handleClick()
}
Objective-C implementation
Now, in your View Controller implementation file, import the SDK header and declare that you implement the
HADNativeAdDelegateprotocol as well as declare and connect instance variables to your Storyboard or .XIB:
#import <HADFramework/HADFramework.h>
@interface MyViewController : UIViewController <HADNativeAdDelegate>
    @property (strong, nonatomic) HADNativeAd *nativeAd;
    @property (weak, nonatomic) IBOutlet UIView *bannerView;
    @property (weak, nonatomic) IBOutlet HADMediaView *bannerMediaView;
    @property (weak, nonatomic) IBOutlet HADMediaView *iconMediaView;
    @property (weak, nonatomic) IBOutlet UILabel *titleLabel;
    @property (weak, nonatomic) IBOutlet UILabel *descriptionLabel;
    @property (weak, nonatomic) IBOutlet UIButton *ctaButton;
@end
Then, add a method in your View Controller’s implementation file that initializes
HADNativeAdand request an ad to load:
- (void)viewDidLoad {
    [super viewDidLoad];
    self.nativeAd = [[HADNativeAd alloc] initWithPlacementId:@"PLACEMENT_ID" content:@[HADAdContentTitle, HADAdContentDescription, HADAdContentBanner, HADAdContentIcon] delegate:self];
        [self.nativeAd loadAd];
}
You may set
contentparam on HADNativeAd initialization to get only needed properties. If you didn’t setcontentparam then you get all properties.
to get title text
HADAdContentTitle
to get description text
HADAdContentDescription
to get banner
HADAdContentBanner
to get icon
HADAdContentIcon
Now that you have added the code to load the ad, add the following functions to handle loading failures and to construct the ad once it has loaded:
-(void)HADNativeAdDidFail:(HADNativeAd *)nativeAd error:(NSError *)error
    NSLog(@"ERROR: %@",error.localizedDescription);
}

-(void)HADNativeAdDidLoad:(HADNativeAd *)nativeAd {
    [self.bannerMediaView loadHADBanner:nativeAd animated:NO completion:^(NSError * _Nullable error, UIImage * _Nullable image) {
        if (!error) {
                NSLog(@"Banner downloaded");
        } else {
                NSLog(@"Banner download error: %@", error);
        }
    }];
    [self.iconMediaView loadHADIcon:nativeAd animated:NO completion:^(NSError * _Nullable error, UIImage * _Nullable image) {
        if (!error) {
                NSLog(@"Icon downloaded");
        } else {
                NSLog(@"Icon download error: %@", error);
        }
    }];
    [self.titleLabel setText:nativeAd.title];
    [self.descriptionLabel setText:nativeAd.desc];
    [self.ctaButton setTitle:nativeAd.cta forState:UIControlStateNormal];
}

-(void)HADNativeAdDidClick:(HADNativeAd *)nativeAd
    NSLog(@"CLICKED AD");
}
Handle click on your implementation of “call to action” button
- (IBAction)handleClick:(id)sender {
    [self.nativeAd handleClick];
}
Native Ad iOS templates
The Native Ad templates allows you to use prepared Ad banner views but with possibility of full customization.
Just add HADBannerTemplateView to your view controller and set desired banner template and custom params.
You can choose from six layouts:
| Layout | Description |
|---|---|
HADBannerTemplateTypes.BlockOne |
Flexible block banner with aspect ratio 320:230 |
HADBannerTemplateTypes.BlockTwo |
Flexible block banner with aspect ratio 320:300 |
HADBannerTemplateTypes.BlockThree |
Flexible block banner with aspect ratio 320:340 |
HADBannerTemplateTypes.LineOne |
Line banner with 50pt height |
HADBannerTemplateTypes.LineTwo |
Line banner with 60pt height |
HADBannerTemplateTypes.LineThree |
Line banner with 90pt height |
Custom params
All custom params starts with custom prefix
| Group | Param | Description |
|---|---|---|
| Background color | customBackgroundColor |
Whole ad background |
| Background color | customButtonBackgroundColor |
CTA button background |
| Background color | customAgeRatingBackgroundColor |
AgeRating label background |
| Text colors | customTitleTextColor |
Title label text color |
| Text colors | customDescriptionTextColor |
Description label text color |
| Text colors | customPoweredByTextColor |
PoweredBy label text color |
| Text colors | customAgeRatingTextColor |
AgeRating label text color |
| Text colors | customButtonTitleColor |
CTA button title text color |
| Corner radius | customIconCornerRadius |
Icon |
| Corner radius | customBannerCornerRadius |
Banner |
| Corner radius | customButtonCornerRadius |
CTA button |
| Corner radius | customAgeRatingCornerRadius |
Age rating label |
| CTA button border | customButtonBorderColor |
Border color |
| CTA button border | customButtonBorderWidth |
Border width |
| Star rating | customStarRatingFilledColor |
Filled color |
| Star rating | customStarRatingEmptyColor |
Empty color |
| Star rating | customStarRatingTextColor |
Right text color |
| Click mode | customClickMode = .Button |
Handle click only on button |
| Click mode | customClickMode = .WholeBanner |
Handle click everywhere |
Swift example
import HADFramework

class MyViewController: UIViewController, HADBannerTemplateViewDelegate {
    @IBOutlet weak var bannerTemplateView: HADBannerTemplateView!

    override func viewDidLoad() {
        super.viewDidLoad()
        //Just set HADBannerTemplateTypes param in loadAd method
        bannerTemplateView.loadAd("PLACEMENT_ID", bannerTemplate: .One, delegate: self)
        //And customize everything
        bannerTemplateView.customBackgroundColor = UIColor.lightGrayColor()
        bannerTemplateView.customTitleTextColor = UIColor.blueColor()
        bannerTemplateView.customDescriptionTextColor = UIColor.darkGrayColor()
        bannerTemplateView.customIconCornerRadius = 6
        bannerTemplateView.customButtonBackgroundColor = UIColor.clearColor()
        bannerTemplateView.customButtonBorderColor = UIColor.purpleColor()
        bannerTemplateView.customButtonBorderWidth = 1
        bannerTemplateView.customButtonTitleColor = UIColor.purpleColor()
        bannerTemplateView.customButtonCornerRadius = 6
        bannerTemplateView.customBannerCornerRadius = 6
        bannerTemplateView.customStarRatingFilledColor = UIColor.greenColor()
        bannerTemplateView.customStarRatingEmptyColor = UIColor.purpleColor()
        bannerTemplateView.customStarRatingTextColor = UIColor.purpleColor()
        bannerTemplateView.customClickMode = .Button
    }

    //MARK: HADBannerTemplateViewDelegate

    func HADTemplateViewDidLoad(view: HADBannerTemplateView) {
        print("AD LOADED")
    }

    func HADTemplateViewDidClick(view: HADBannerTemplateView) {
        print("CLICKED AD")
    }

    func HADTemplateView(view: HADBannerTemplateView, didFailWithError error: NSError?) {
        print("ERROR: %@", error?.localizedDescription)
    }
}
Objective-C example
#import <HADFramework/HADFramework.h>

@interface MyViewController () <HADBannerTemplateViewDelegate>
@property (weak, nonatomic) IBOutlet HADBannerTemplateView *bannerTemplateView;
@end

@interface MyViewController : UIViewController <HADNativeAdDelegate>
-(void)viewDidLoad {
    [super viewDidLoad];
    //Just set HADBannerTemplateTypes param in loadAd method
    [self.bannerTemplateView loadAd:@"PLACEMENT_ID" bannerTemplate:HADBannerTemplateTypesBlockOne delegate:self];
    //And customize everything
    [self.bannerTemplateView setCustomBackgroundColor:[UIColor lightGrayColor]];
    [self.bannerTemplateView setCustomTitleTextColor:[UIColor blackColor]];
    [self.bannerTemplateView setCustomDescriptionTextColor:[UIColor darkGrayColor]];
    [self.bannerTemplateView setCustomIconCornerRadius:6.0];
    [self.bannerTemplateView setCustomButtonBackgroundColor:[UIColor clearColor]];
    [self.bannerTemplateView setCustomButtonBorderColor:[UIColor purpleColor]];
    [self.bannerTemplateView setCustomButtonBorderWidth:1.0];
    [self.bannerTemplateView setCustomButtonTitleColor:[UIColor purpleColor]];
    [self.bannerTemplateView setCustomButtonCornerRadius:6.0];
    [self.bannerTemplateView setCustomBannerCornerRadius :6.0];
    [self.bannerTemplateView setCustomAgeRatingCornerRadius:4.0];
    [self.bannerTemplateView setCustomStarRatingFilledColor:[UIColor greenColor]];
    [self.bannerTemplateView setCustomStarRatingEmptyColor:[UIColor purpleColor]];
    [self.bannerTemplateView setCustomStarRatingTextColor:[UIColor purpleColor]];
    [self.bannerTemplateView setCustomClickMode:BannerTemplateCustomClickModesButton];
}

#pragma mark - HADBannerTemplateViewDelegate

-(void)HADTemplateViewDidLoad:(HADBannerView *)view {
    NSLog(@"HADTemplateViewDidLoad");
}

-(void)HADTemplateView:(HADBannerView *)view didFailWithError:(NSError *)error {
    NSLog(@"HADTemplateViewDidFai:l %@", error);
}

-(void)HADTemplateViewDidClick:(HADBannerView *)view {
    NSLog(@"HADTemplateViewDidClick");
}

@end
Native Ads in Android
The Native Ad API allows you to build a customized experience for the ads you show in your app. When using the Native Ad API, instead of receiving an ad ready to be displayed, you will receive a group of ad properties such as a title, an image, a call to action, and you will have to use them to construct a custom view where the ad is shown.
Sample projects:
- Download latest release and extract the Example app for Android.
Set up the SDK
Add following under manifest tag to your AndroidManifest.xml:
 <uses-permission android:name="android.permission.INTERNET"/>
 <uses-permission android:name="android.permission.ACCESS_NETWORK_STATE" />
Put the HyperAdxSDK_xxx.jar in “libs” folder in your Android Studio or Eclipse. Add it to dependencies in build.grandle file. Also you need to add google play services.
dependencies {
    compile fileTree(include: ['*.jar'], dir: 'libs')
    compile 'com.android.support:appcompat-v7:23.4.0'
    compile 'com.android.support:support-v4:23.4.0'
    compile 'com.google.android.gms:play-services-ads:9.0.2'
    compile 'com.google.android.gms:play-services-base:9.0.2'
}
Then, create a function that requests a native ad:
private void showNativeAd() {
    adFrame = (FrameLayout) findViewById(R.id.adContent);
    nativeAd = new HADNativeAd(this, "YOUR_PLACEMENT_ID"); //Native AD constructor
    nativeAd.setContent("title,icon,main,description"); // Set content to load
    nativeAd.setAdListener(new AdListener() { // Add Listeners
        @Override
        public void onAdLoaded(Ad ad) { // Called when AD is Loaded

        }
        @Override
        public void onError(Ad nativeAd, String error) { // Called when load is fail

        }

        @Override
        public void onAdClicked() { // Called when user click on AD

        }
    });
    nativeAd.loadAd(); // Call to load AD
}
The next step is to extract the ad metadata and use its properties to build your customized native UI. You can either create your custom view in a layout .xml, or you can add elements in code. The custom layout .xml. For example:
<?xml version="1.0" encoding="utf-8"?>
<RelativeLayout xmlns:android="http://schemas.android.com/apk/res/android"
    android:layout_width="wrap_content"
    android:layout_height="wrap_content" >
    <ImageView
        android:id="@+id/ivIcon"
        android:layout_width="50dp"
        android:layout_height="50dp"
        android:layout_alignParentLeft="true"
        android:layout_alignParentTop="true" />
    <TextView
        android:id="@+id/tvTitle"
        android:layout_width="wrap_content"
        android:layout_height="wrap_content"
        android:layout_alignParentTop="true"
        android:layout_toRightOf="@+id/ivIcon"
        android:paddingLeft="10dp"
        android:textSize="18sp"
        android:textStyle="bold"
        android:typeface="monospace" />
    <ImageView
        android:id="@+id/ivImage"
        android:layout_width="480dp"
        android:layout_height="168dp"
        android:layout_alignParentLeft="true"
        android:layout_below="@+id/ivIcon" />
    <TextView
        android:id="@+id/tvDescription"
        android:layout_width="wrap_content"
        android:layout_height="wrap_content"
        android:layout_alignParentLeft="true"
        android:layout_below="@+id/ivImage" />
</RelativeLayout>
Now you can use this layout .xml as a frame. For example:
<?xml version="1.0" encoding="utf-8"?>
<RelativeLayout xmlns:android="http://schemas.android.com/apk/res/android"
    xmlns:tools="http://schemas.android.com/tools"
    android:layout_width="match_parent"
    android:layout_height="match_parent"
    android:paddingBottom="@dimen/activity_vertical_margin"
    android:paddingLeft="@dimen/activity_horizontal_margin"
    android:paddingRight="@dimen/activity_horizontal_margin"
    android:paddingTop="@dimen/activity_vertical_margin">
    <TextView
        android:layout_width="wrap_content"
        android:layout_height="wrap_content"
        android:text="Hello World!" />
    <FrameLayout
        android:id="@+id/adContent"
        android:layout_width="wrap_content"
        android:layout_height="wrap_content"
        android:layout_alignParentBottom="true"
        android:layout_centerHorizontal="true" >
    </FrameLayout>
</RelativeLayout>
Modify the onAdLoaded function above to retrieve the ad properties. The SDK will log the impression and handle the click automatically.
private NativeAd nativeAd;
private View AdView;
private FrameLayout adFrame; //FrameLayout with all views that you need
-------------------------------------------------------------------------
@Override
public void onAdLoaded(Ad ad) { // Called when AD is Loaded
    Toast.makeText(MainActivity.this, "Native ad loaded", Toast.LENGTH_SHORT).show();
    AdView = nativeAd.getNativeAdView(ad, R.layout.native_ad_layout); // Registering view for AD
    adFrame.addView(AdView); //Adding view to frame
    // Create native UI using the ad metadata.
    TextView tvTitle = (TextView) AdView.findViewById(R.id.tvTitle);
    TextView tvDescription = (TextView) AdView.findViewById(R.id.tvDescription);
    ImageView ivIcon = (ImageView) AdView.findViewById(R.id.ivIcon);
    ImageView ivImage = (ImageView) AdView.findViewById(R.id.ivImage);
    // Setting the Text.
    tvTitle.setText(ad.getTitle());
    tvDescription.setText(ad.getDescription());
    // Downloading and setting the ad icon.
    NativeAd.downloadAndDisplayImage(ivIcon, ad.getIcon_url());
    // Download and setting the cover image.
    NativeAd.downloadAndDisplayImage(ivImage, ad.getImage_url());
}
If you want to use Native AD in RecyclerView you should use registerViewForInteraction(Ad ad, View adView) method instead of getNativeAdView(Ad ad, int ResID) Sample:
   @Override
    public void onBindViewHolder(final MyViewHolder holder, int position) {

        if (getItemViewType(position) == AD_TYPE) {

            final HADNativeAd nativeAd = new HADNativeAd(activity,
                    activity.getString(R.string.Placement)
            ); //Native AD constructor

            nativeAd.setContent("title,icon,description"); // Set content to load
            nativeAd.setAdListener(new AdListener() { // Add Listeners

                @Override
                public void onAdLoaded(Ad ad) { // Called when AD is Loaded
                    Toast.makeText(activity, "Native ad loaded", Toast.LENGTH_SHORT).show();

                    holder.ivIcon.setVisibility(View.VISIBLE);


                    nativeAd.registerViewForInteraction(ad, holder.rlRoot); // Configuring your view

                    //  Setting the Text.
                    holder.title.setText(ad.getTitle());
                    holder.genre.setText(ad.getDescription());
                    //  Downloading and setting the ad icon.
                    HADNativeAd.downloadAndDisplayImage(holder.ivIcon, ad.getIcon_url());

                }

                @Override
                public void onError(Ad nativeAd, String error) { // Called when load is fail
                    Toast.makeText(activity, "Native Ad failed to load with error: " + error, Toast.LENGTH_SHORT).show();

                }

                @Override
                public void onAdClicked() { // Called when user click on AD
                    Toast.makeText(activity, "Tracked Native Ad click", Toast.LENGTH_SHORT).show();

                }
            });

            nativeAd.loadAd(); // Call to load AD


        } else {

            holder.ivIcon.setVisibility(View.GONE);

            Movie movie = moviesList.get(position);
            holder.title.setText(movie.getTitle());
            holder.genre.setText(movie.getGenre());
            holder.year.setText(movie.getYear());
        }
    }
Banner
HyperAdX uses Placement ID to allow access to the API. You can register a new App and create Placement at our developer portal.
HyperAdX expects for Placement ID to be included in all API requests to the server in a get variable that looks like the following:
Mobile Web
- Go to the Publisher UI
- Create new App
- Create new Placement for it
- On placements list click on Tag & SDK and select appropriate integration.
iOS
The HyperAdX Banner ads allows you to monetize your iOS apps with banner ads. This guide explains how to add banner ads to your app. If you’re interested in other kinds of ad units, see the list of available types.
Set up the SDK
Manual
- Download and extract the HADFramework for iOS.
- Open your project target General tab.
- Drag the HADFramework.framework file to Embedded Binaries.
- Open your project target Build Settings tab. (Required only for Objective-C projects)
- Set “Embedded Content Contains Swift Code” to Yes. (Required only for Objective-C projects)
- Add the AdSupport framework to your project.
iOS 7
If you want to support iOS7 - download our legacy SDK. It supports only NativeAds.
Swift implementation
First of all, in your AppDelegate file create an instance of HADFramework Import the SDK
import HADFramework
And in your application didFinishLaunchingWithOptions method call HAD.create()
func application(application: UIApplication, didFinishLaunchingWithOptions launchOptions: [NSObject: AnyObject]?) -> Bool {
  // Override point for customization after application launch.
  HAD.create()
  return true
}
Ok, let’s move to your View Controller. Import the SDK, declare that you implement the HADBannerViewDelegate protocol and add an instance variable for the interstitial ad unit:
import UIKit
import HADFramework

class MyViewController: UIViewController, HADBannerViewDelegate {
    var bannerView: HADBannerView!
}
Then, on your View Controller’s viewDidLoad implementation, use property of the HADBannerView class and add it to your view. Since HADBannerView is a subclass of UIView, you can add it to your view hierarchy just as with any other view:
override func viewDidLoad() {
    super.viewDidLoad()
    bannerView = HADBannerView(frame: CGRectMake(0,0, view.frame.size.width, 50))
    view.addSubview(bannerView);
    bannerView.loadAd("PLACEMENT_ID", bannerSize: .Height50, delegate: self)
}
If you are building your app for iPad, consider using the
HADBannerSize.Height90size instead. The HADFramework also supports the 300x250 ad size. Configure the HADBannerView with the following ad size:HADBannerSize.Block300x250:
override func viewDidLoad() {
    super.viewDidLoad()
    bannerView = HADBannerView(frame: CGRectMake(10, 100, 300, 250))
    view.addSubview(bannerView);
    bannerView.loadAd("PLACEMENT_ID", bannerSize: .Block300x250, delegate: self)
}
Then, add and implement the following three functions in your View Controller implementation file to handle ad loading failures and completions:
//MARK: HADBannerViewDelegate

func HADViewDidLoad(view: HADBannerView) {
    print("AD LOADED")
}

func HADViewDidClick(view: HADBannerView) {
    print("CLICKED AD")
}

func HADView(view: HADBannerView, didFailWithError error: NSError?) {
    print("ERROR: %@", error?.localizedDescription)
}
Objective-C implementation
First of all, in your AppDelegate file create an instance of HADFramework Import the SDK header in AppDelegate.h:
#import <HADFramework/HADFramework.h>
And in your application didFinishLaunchingWithOptions method call [HAD create]
- (BOOL)application:(UIApplication *)application didFinishLaunchingWithOptions:(NSDictionary *)launchOptions {
  // Override point for customization after application launch.
  [HAD create];
  return YES;
}
Ok, let’s move to your View Controller. In implementation file, import the SDK header, declare that you implement the HADBannerViewDelegate protocol and add an instance variable for the banner view:
#import <HADFramework/HADFramework.h>

@interface MyViewController () <HADBannerViewDelegate>
@property (weak, nonatomic) IBOutlet HADBannerView *bannerView;
@end
Then, on your View Controller’s viewDidLoad implementation, use property of the HADBannerView class and add it to your view. Since HADBannerView is a subclass of UIView, you can add it to your view hierarchy just as with any other view:
-(void)viewDidLoad {
    [super viewDidLoad];
    self.bannerView = [[HADBannerView alloc] initWithFrame:CGRectMake(0,0, self.view.frame.size.width, 50)];
    [self.view addSubview:self.bannerView];
    [self.bannerView loadAd:@"PLACEMENT_ID" bannerSize:HADBannerSizeHeight50 delegate:self];
}
If you are building your app for iPad, consider using the
HADBannerSizeHeight90size instead. The HADFramework also supports the 300x250 ad size. Configure the HADBannerView with the following ad size:HADBannerSizeBlock300x250:
-(void)viewDidLoad {
    [super viewDidLoad];
    self.bannerView = [[HADBannerView alloc] initWithFrame:CGRectMake(10, 100, 300, 250)];
    [self.view addSubview:self.bannerView];
    [self.bannerView loadAd:@"PLACEMENT_ID" bannerSize:HADBannerSizeBlock300x250 delegate:self];
}
Then, add and implement the following three functions in your View Controller implementation file to handle ad loading failures and completions:
#pragma mark - HADBannerViewDelegate

-(void)HADViewDidLoad:(HADBannerView *)view {
    NSLog(@"HADViewDidLoad");
}

-(void)HADView:(HADBannerView *)view didFailWithError:(NSError *)error {
    NSLog(@"HADViewDidFai:l %@", error);
}

-(void)HADViewDidClick:(HADBannerView *)view {
    NSLog(@"HADViewDidClick");
}
Interstitial ads
Mobile Web
- Go to the Publisher UI
- Create new App
- Create new Placement for it
- On placements list click on Tag & SDK and select appropriate integration.
iOS
The HyperAdX Interstitial ads allows you to monetize your iOS apps with banner ads. This guide explains how to add banner ads to your app. If you’re interested in other kinds of ad units, see the list of available types.
Set up the SDK
Manual
- Download and extract the HADFramework for iOS.
- Open your project target General tab.
- Drag the HADFramework.framework file to Embedded Binaries.
- Open your project target Build Settings tab. (Required only for Objective-C projects)
- Set “Embedded Content Contains Swift Code” to Yes. (Required only for Objective-C projects)
- Add the AdSupport framework to your project.
iOS 7
If you want to support iOS7 - download our legacy SDK. It supports only NativeAds.
Swift implementation
First of all, in your AppDelegate file create an instance of HADFramework Import the SDK
import HADFramework
And in your application didFinishLaunchingWithOptions method call HAD.create()
func application(application: UIApplication, didFinishLaunchingWithOptions launchOptions: [NSObject: AnyObject]?) -> Bool {
  // Override point for customization after application launch.
  HAD.create()
  return true
}
Ok, let’s move to your View Controller. Import the SDK, declare that you implement the HADInterstitialDelegate protocol and add an instance variable for the interstitial ad unit:
import UIKit
import HADFramework

class MyViewController: UIViewController, HADInterstitialDelegate {

}
Add a function in your View Controller that initializes the interstitial view. You will typically call this function ahead of the time you want to show the ad:
override func viewDidLoad() {
  super.viewDidLoad()
  loadInterstitalAd()
}

func loadInterstitalAd() {
  let interstitial = HADInterstitial(placementId: "PLACEMENT_ID")
  interstitial.delegate = self
  interstitial.loadAd()
}
Now that you have added the code to load the ad, add the following functions to handle loading failures and to display the ad once it has loaded:
//MARK: HADInterstitial Delegate

func HADInterstitialDidLoad(controller: HADInterstitial) {
  controller.modalTransitionStyle = .CoverVertical
  controller.modalPresentationStyle = .FullScreen
  presentViewController(controller, animated: true, completion: nil)
}

func HADInterstitialDidFail(controller: HADInterstitial, error: NSError?) {
  print("HADInterstitialDidFail: \(error)")
}
Optionally, you can add the following functions to handle the cases where the full screen ad is closed or when the user clicks on it:
func HADInterstitialDidClick(controller: HADInterstitial) {
  print("HADInterstitialDidClick")
}

func HADInterstitialWillClose(controller: HADInterstitial) {
  print("HADInterstitialWillClose")
}

func HADInterstitialDidClose(controller: HADInterstitial) {
  print("HADInterstitialDidClose")
}
Objective-C implementation
First of all, in your AppDelegate file create an instance of HADFramework Import the SDK header in AppDelegate.h:
#import <HADFramework/HADFramework.h>
And in your application didFinishLaunchingWithOptions method call [HAD create]
- (BOOL)application:(UIApplication *)application didFinishLaunchingWithOptions:(NSDictionary *)launchOptions {
  // Override point for customization after application launch.
  [HAD create];
  return YES;
}
Ok, let’s move to your View Controller. In implementation file, import the SDK header, declare that you implement the HADInterstitialDelegate protocol and add an instance variable for the interstitial ad unit:
#import <UIKit/UIKit.h>
#import <HADFramework/HADFramework.h>

@interface MyViewController () <HADInterstitialDelegate>
@property (strong, nonatomic) HADInterstitial *interstitial;
@end
Add a function in your View Controller that initializes the interstitial view. You will typically call this function ahead of the time you want to show the ad:
- (void) viewDidLoad {
  [super viewDidLoad];

  [self loadInterstitialAd];
}

- (void) loadInterstitalAd {
  self.interstitial = [[HADInterstitial alloc] initWithPlacementId:@"PLACEMENT_ID"];
  self.interstitial.delegate = self;
  [self.interstitial loadAd];
}
Now that you have added the code to load the ad, add the following functions to handle loading failures and to display the ad once it has loaded:
#pragma mark - HADInterstitialDelegate

-(void)HADInterstitialDidLoad:(HADInterstitial *)controller {
  NSLog(@"HADInterstitialDidLoad");
  self.interstitial.modalPresentationStyle = UIModalPresentationFullScreen;
  self.interstitial.modalTransitionStyle = UIModalTransitionStyleCoverVertical;
  [self presentViewController:self.interstitial animated:YES completion:nil];
}

-(void)HADInterstitialDidFail:(HADInterstitial *)controller error:(NSError *)error {
  NSLog(@"HADInterstitialDidFail: %@", error);
}
Optionally, you can add the following functions to handle the cases where the full screen ad is closed or when the user clicks on it:
-(void)HADInterstitialDidClick:(HADInterstitial *)controller {
  NSLog(@"HADInterstitialDidClick");
}

-(void)HADInterstitialWillClose:(HADInterstitial *)controller {
  NSLog(@"HADInterstitialWillClose");
}

-(void)HADInterstitialDidClose:(HADInterstitial *)controller {
  NSLog(@"HADInterstitialDidClose");
}
Android
The HyperAdX Interstitial ads allows you to monetize your Android apps with banner ads. This guide explains how to add banner ads to your app. If you’re interested in other kinds of ad units, see the list of available types.
Sample projects:
- Download latest release and extract the Example app for Android.
Set up the SDK
Add following under manifest tag to your AndroidManifest.xml:
<uses-permission android:name="android.permission.INTERNET"/>
<uses-permission android:name="android.permission.ACCESS_NETWORK_STATE" />
Put the HyperAdxSDK_xxx.jar in “libs” folder in your Android Studio or Eclipse. Add it to dependencies in build.grandle file. Also you need to add google play services.
dependencies {
    compile fileTree(include: ['*.jar'], dir: 'libs')
    compile 'com.android.support:appcompat-v7:23.4.0'
    compile 'com.android.support:support-v4:23.4.0'
    compile 'com.google.android.gms:play-services-ads:9.0.2'
    compile 'com.google.android.gms:play-services-base:9.0.2'
}
Then, create a function that requests a interstitial ad. The SDK will log the impression and handle the click automatically.
private void loadInterstitialAd() {
        interstitialAd = new HADInterstitialAd(this /*Strongly recomend to use Activity context*/,
                getString(R.string.Placement)); //Interstitial AD constructor.

        interstitialAd.setAdListener(new InterstitialAdListener() { // Set Listener
            @Override
            public void onAdLoaded(com.hyperadx.lib.sdk.interstitialads.Ad ad) { // Called when AD is Loaded
                iAd = ad;
                Toast.makeText(MainActivity.this, "Interstitial Ad loaded", Toast.LENGTH_SHORT).show();
            }

            @Override
            public void onError(com.hyperadx.lib.sdk.interstitialads.Ad Ad, String error) { // Called when load is fail
                Toast.makeText(MainActivity.this, "Interstitial Ad failed to load with error: " + error, Toast.LENGTH_SHORT).show();
            }

            @Override
            public void onInterstitialDisplayed() { // Called when Ad was impressed
                Toast.makeText(MainActivity.this, "Tracked Interstitial Ad impression", Toast.LENGTH_SHORT).show();
            }

            @Override
            public void onInterstitialDismissed(com.hyperadx.lib.sdk.interstitialads.Ad ad) { // Called when Ad was dissnissed by user
                Toast.makeText(MainActivity.this, "Interstitial Ad Dismissed", Toast.LENGTH_SHORT).show();
            }

            @Override
            public void onAdClicked() { // Called when user click on AD
                Toast.makeText(MainActivity.this, "Tracked Interstitial Ad click", Toast.LENGTH_SHORT).show();

            }
        });
        interstitialAd.loadAd(); // Call to load AD
    }

public void showInterstitial(View view) {
    if (iAd != null)
        InterstitialAd.show(iAd); // Call to show AD
    else
        Toast.makeText(this, "The Interstitial AD not ready yet. Try again!", Toast.LENGTH_LONG).show();
}
Segments
With sending in-app events triggered by your users you can improve your monetization and get higher earnings.
Our platform automatically build audiences using your in-app data (provided by your events) and assigns high performing campaigns individually to each segment.
Also our advertisers and mediabuying department make higher bids for more engaged users.
Android
You can send the events very easy. Just call the method sendEvent(Context, event_code) from HADEvent class.
Example: HADEvent.sendEvent(this, Event.GAMING_ACHIEVEMENT_UNLOCKED);
iOS
You can send the events very easy. Just call the method sendEvent(type: HADEventType) from HADEvent class.
Swift example: HADEvent.sendEvent(.AchievementUnlocked)
Objective-C example: [HADEvent sendEvent:HADEventTypeAchievementUnlocked];
Event codes
Authenticate events
- 101 Registration
- 102 Login
- 103 Open
eCommerce events
- 201 Add to Wishlist
- 202 Add to Cart
- 203 Added Payment Info
- 204 Reservation
- 205 Checkout Initiated
- 206 Purchase
Content events
- 301 Search
- 302 Content View
Gaming events
- 401 Tutorial Completed
- 402 Level Achieved
- 403 Achievement Unlocked
- 404 Spent Credit
Social events
- 501 Invite
- 502 Rated
- 504 Share
API
Native ads API
HTTP Request
GET http://ad.dispply.com/v2/ads/PLACEMENT
Query Parameters
| Parameter | Required | Default | Description |
|---|---|---|---|
| ip | false | Requester’s ip | Device IP |
| user_agent | false | Requester’s user-agent | Device user-agent |
| platform | false | No | Device platform (ios/android) |
| device_type | false | phone | Device type (phone/tablet) |
| creative_type | false | image | Type of creative (image/video) |
| format | false | No | Creative’s format (ex. 120x80) |
| content | false | title,icon,main | Required content separated by comma (ex. title,desc,icon,main) |
| callback | false | No | Callback function for JSONP request |
| ios_idfa | false | No | iOS advertising ID |
| gaid | false | No | Android advertising ID |
Response
The above endpoint returns JSON structured like this:
{
  "status": "success",
  "ads": [
    {
      "title": "Ad title",
      "description": "Ad description",
      "rating": "3.44",
      "ratings_count": "9872",
      "click_url": "http://click.com",
      "creatives": {
        "icon": {
          "url": "http://cdn.com/icon",
          "width": "60",
          "height": "60"
        },
        "image": {
          "url": "http://cdn.com/image",
          "width": "1200",
          "height": "627"
        },
        "video": "VAST"
      },
      "beacons": ["http://pixel.com"]
    }
  ]
}
For
JSONPresponse like this:
callback({"status": "success", "ads": []})
Developer Reports
HTTP Request
GET http://hyperadx.com/publishers/api/v1/developer/reports
Query Parameters
| Parameter | Required | Default | Description |
|---|---|---|---|
| access_token | true | Publisher access token (can be obtained in developer portal) | |
| attributes | false | app | Comma-separated list of attributes for grouping: app, placement, country, day, hour, month |
| page | false | 1 | Result page |
| date_start | false | Date start (format is \“YYYY-MM-DD\”) | |
| date_end | false | Date end (format is \“YYYY-MM-DD\”) | |
| app_id | false | Comma delimited list of app ids | |
| placement_id | false | Comma delimited list of placements ids | |
| country | false | Country | |
| sorting | false | created_at | Field that would be used to order result: clicks, impressions, ctr, payout, created_at |
Response
http://hyperadx.com/publishers/api/v1/developer/reports?access_token={access_token} returns JSON structured like this:
{
  "page": 1,
  "total_pages": 1,
  "total_count": 1,
  "time_zone": "Moscow",
  "data": [
    {
      "app": "Kuphal, Walter and Conroy",
      "app_id": 3,
      "clicks": 456,
      "impressions": 1780,
      "ctr": 230,
      "payout": 110,
      "created_at": "2016-09-07T10:35:31.000Z"
    }
  ]
}
http://hyperadx.com/publishers/api/v1/developer/reports?access_token={access_token}&attributes=app,placement,country returns JSON structured like this:
{
  "page": 1,
  "total_pages": 1,
  "total_count": 1,
  "time_zone": "Moscow",
  "data": [
    {
      "app": "Kuphal, Walter and Conroy",
      "app_id": 3,
      "placement": "Kuhn Inc",
      "placement_id": 2,
      "country": "RU",
      "clicks": 456,
      "impressions": 1780,
      "ctr": 230,
      "payout": 110,
      "created_at": "2016-09-07T10:35:31.000Z"
    }
  ]
}
Affilate Reports
HTTP Request
GET http://hyperadx.com/publishers/api/v1/reports
Query Parameters
| Parameter | Required | Default | Description |
|---|---|---|---|
| access_token | true | Publisher access token (can be obtained in developer portal) | |
| attributes | true | app | Comma-separated list of attributes: traffic_source, traffic_source_id, ad_unit, ad_unit_id, campaign, campaign_id, clicks, installs, cr, validated_installs, validated_payout, day, hour, year |
| page | false | 1 | Result page |
| date_start | false | Date start (format is \“YYYY-MM-DD\”) | |
| date_end | false | Date end (format is \“YYYY-MM-DD\”) | |
| campaign_id | false | Campaign ID filter | |
| country | false | Country |
Response
http://hyperadx.com/publishers/api/v1/reports?access_token={access_token} returns JSON structured like this:
{
  "page": 1,
  "total_pages": 1,
  "total_count": 1,
  "time_zone": "Moscow",
  "data": [
    {
      "campaign_id": 3,
      "clicks": 456,
      "installs": 11,
      "payout": "0.11",
      "cr": 13,
      "day": "2016-09-06"
    }
  ]
}
http://hyperadx.com/publishers/api/v1/reports?access_token={access_token}&attributes=clicks returns JSON structured like this:
{
  "page": 1,
  "total_pages": 1,
  "total_count": 1,
  "time_zone": "Moscow",
  "data": [
    {
      "clicks": 456
    }
  ]
}
Campaigns List
HTTP Request
GET http://hyperadx.com/publishers/api/v1/campaigns?access_token={access_token}
Query Parameters
| Parameter | Required | Default | Description |
|---|---|---|---|
| access_token | true | Publisher access token (can be obtained in developer portal) |
Response
GET http://hyperadx.com/publishers/api/v1/campaigns?access_token={access_token} returns JSON structured like this:
{
  "data": [
    {
      "id": 3,
      "name": "Bernier, Berge and O'Keefe1",
      "description": "Considine-Cassin",
      "require_approval": false,
      "payout_type": "cpc",
      "cap": null,
      "daily_cap": null,
      "payout": 500,
      "currency": "USD",
      "geo": null,
      "status": "active",
      "platform": "ios",
      "tracking_link": "http://localhost:9292/tracker/clicks?data=RzFR",
      "app": {
        "name": "Hodkiewicz-Murray",
        "icon": "http://lesch.org/camren",
        "url": "http://satterfieldboehm.name/curt"
      }
    }
  ],
  "total_pages": 1,
  "total_count": 1
}
Campaigns Request Approval
HTTP Request
POST http://hyperadx.com/publishers/api/v1/campaigns/{campaign_id}/request_approval?access_token={access_token}
Query Parameters
| Parameter | Required | Default | Description |
|---|---|---|---|
| access_token | true | Publisher access token (can be obtained in developer portal) | |
| campaign_id | true | Campaign ID |
Response
POST http://hyperadx.com/publishers/api/v1/campaigns/3/request_approval?access_token={access_token} returns JSON structured like this:
{
  "id": 3,
  "name": "Bernier, Berge and O'Keefe1",
  "description": "Considine-Cassin",
  "require_approval": false,
  "payout_type": "cpc",
  "cap": null,
  "daily_cap": null,
  "payout": 500.0,
  "currency": "USD",
  "geo": null,
  "status": "active",
  "platform": "ios",
  "tracking_link": "http://localhost:9292/tracker/clicks?data=RzFR",
  "app": {
    "name": "Hodkiewicz-Murray",
    "icon": "http://lesch.org/camren",
    "url": "http://satterfieldboehm.name/curt"
  }
}
Error codes
The HyperAdX API uses the following error codes:
| Error Code | Meaning |
|---|---|
| 400 | Bad Request – Your request sucks |
| 401 | Unauthorized – Your API key is wrong |
| 404 | Not Found – The specified kitten could not be found |
| 406 | Not Acceptable – You requested a format that isn’t json |
| 418 | I’m a teapot |
| 429 | Too Many Requests – You’re requesting too many ads! Slow down! |
| 500 | Internal Server Error – We had a problem with our server. Try again later. |
| 503 | Service Unavailable – We’re temporarially offline for maintanance. Please try again later. |
Mopub Adapter
iOS
Download and extract the HADFramework for iOS.
You can find Mopub adapter example in HyperadxiOSADs_Sample_VERSION/Mediation Adapters/MoPub/.
Setup SDKs:
- Integrate with Mopub SDK
- Install Hyperadx SDK
NOTE - In the Objective-C only project you must create swift header file as described here
Setup Mopub Dashboard
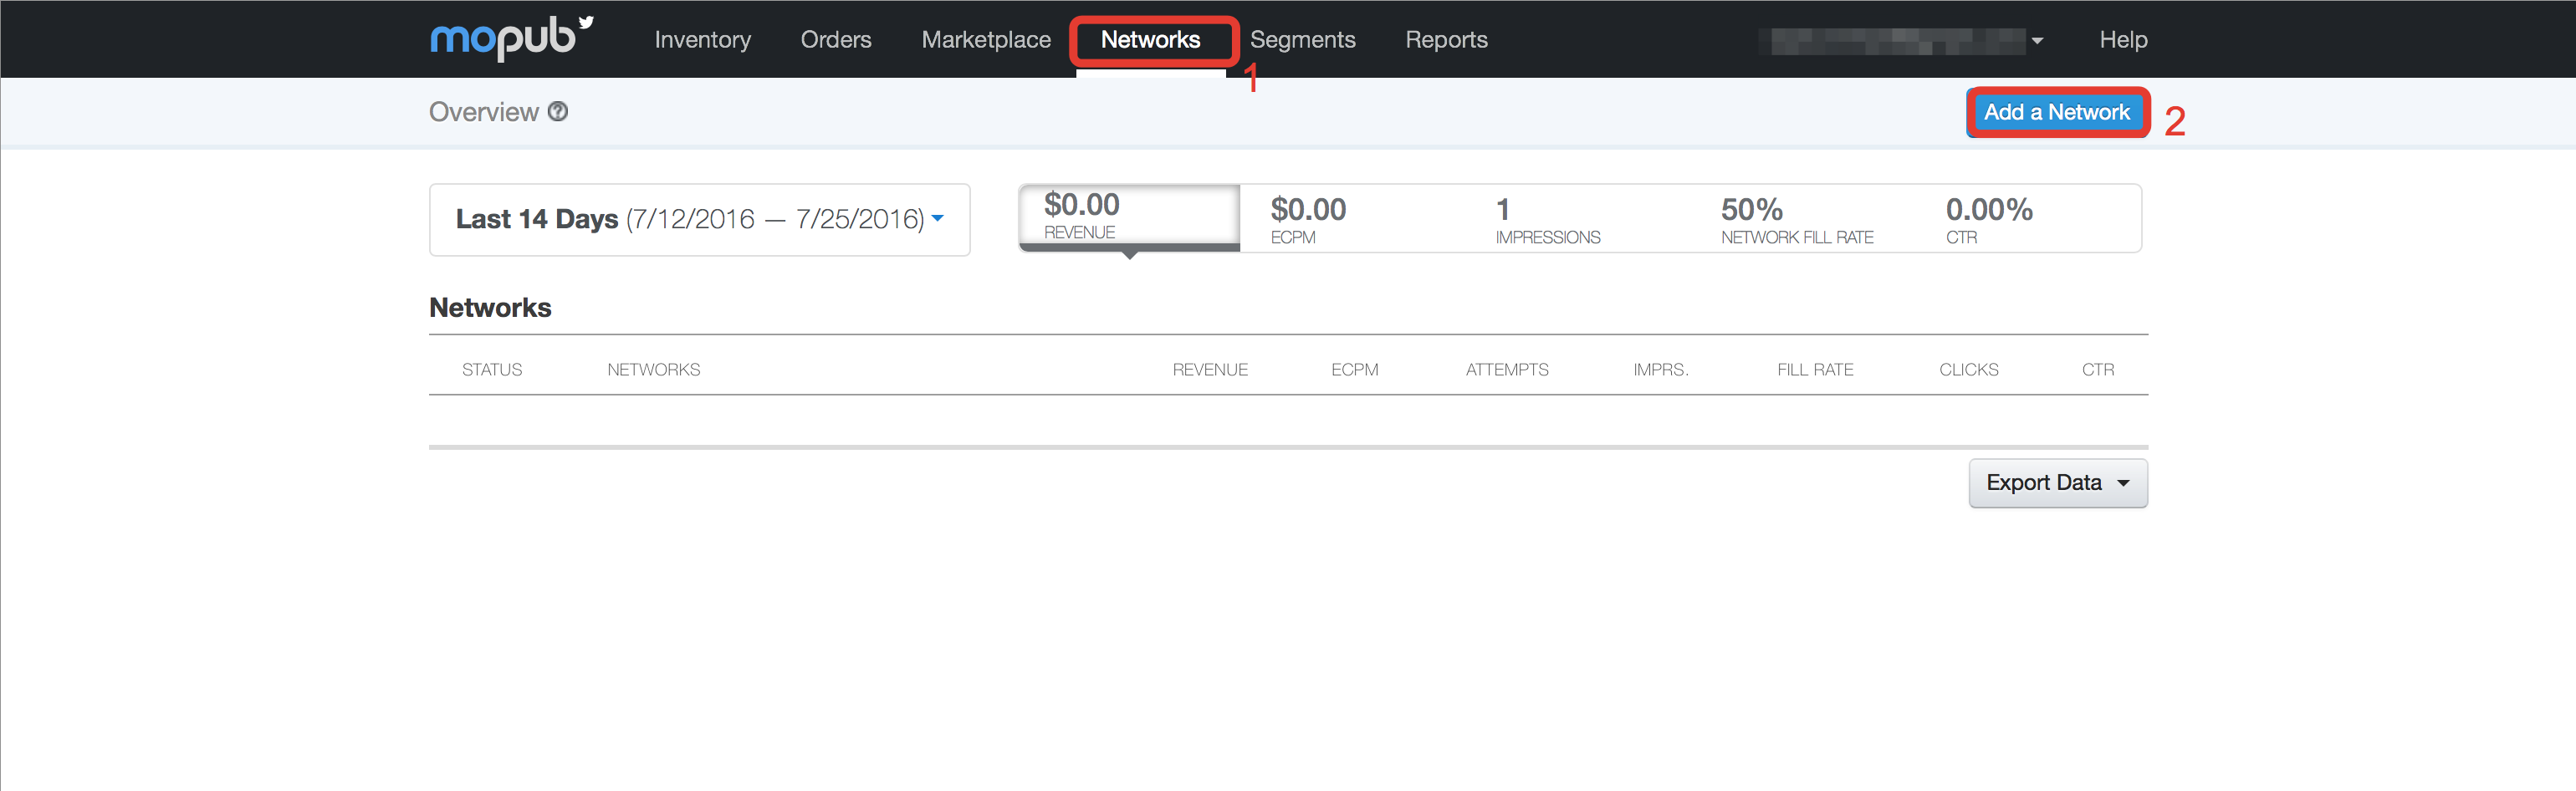
- Create an “Hyperadx” Network in Mopub’s dashboard and connect it to your Ad Units. In Mopub’s dashboard select Networks > Add New network
- Then select Custom Native Network
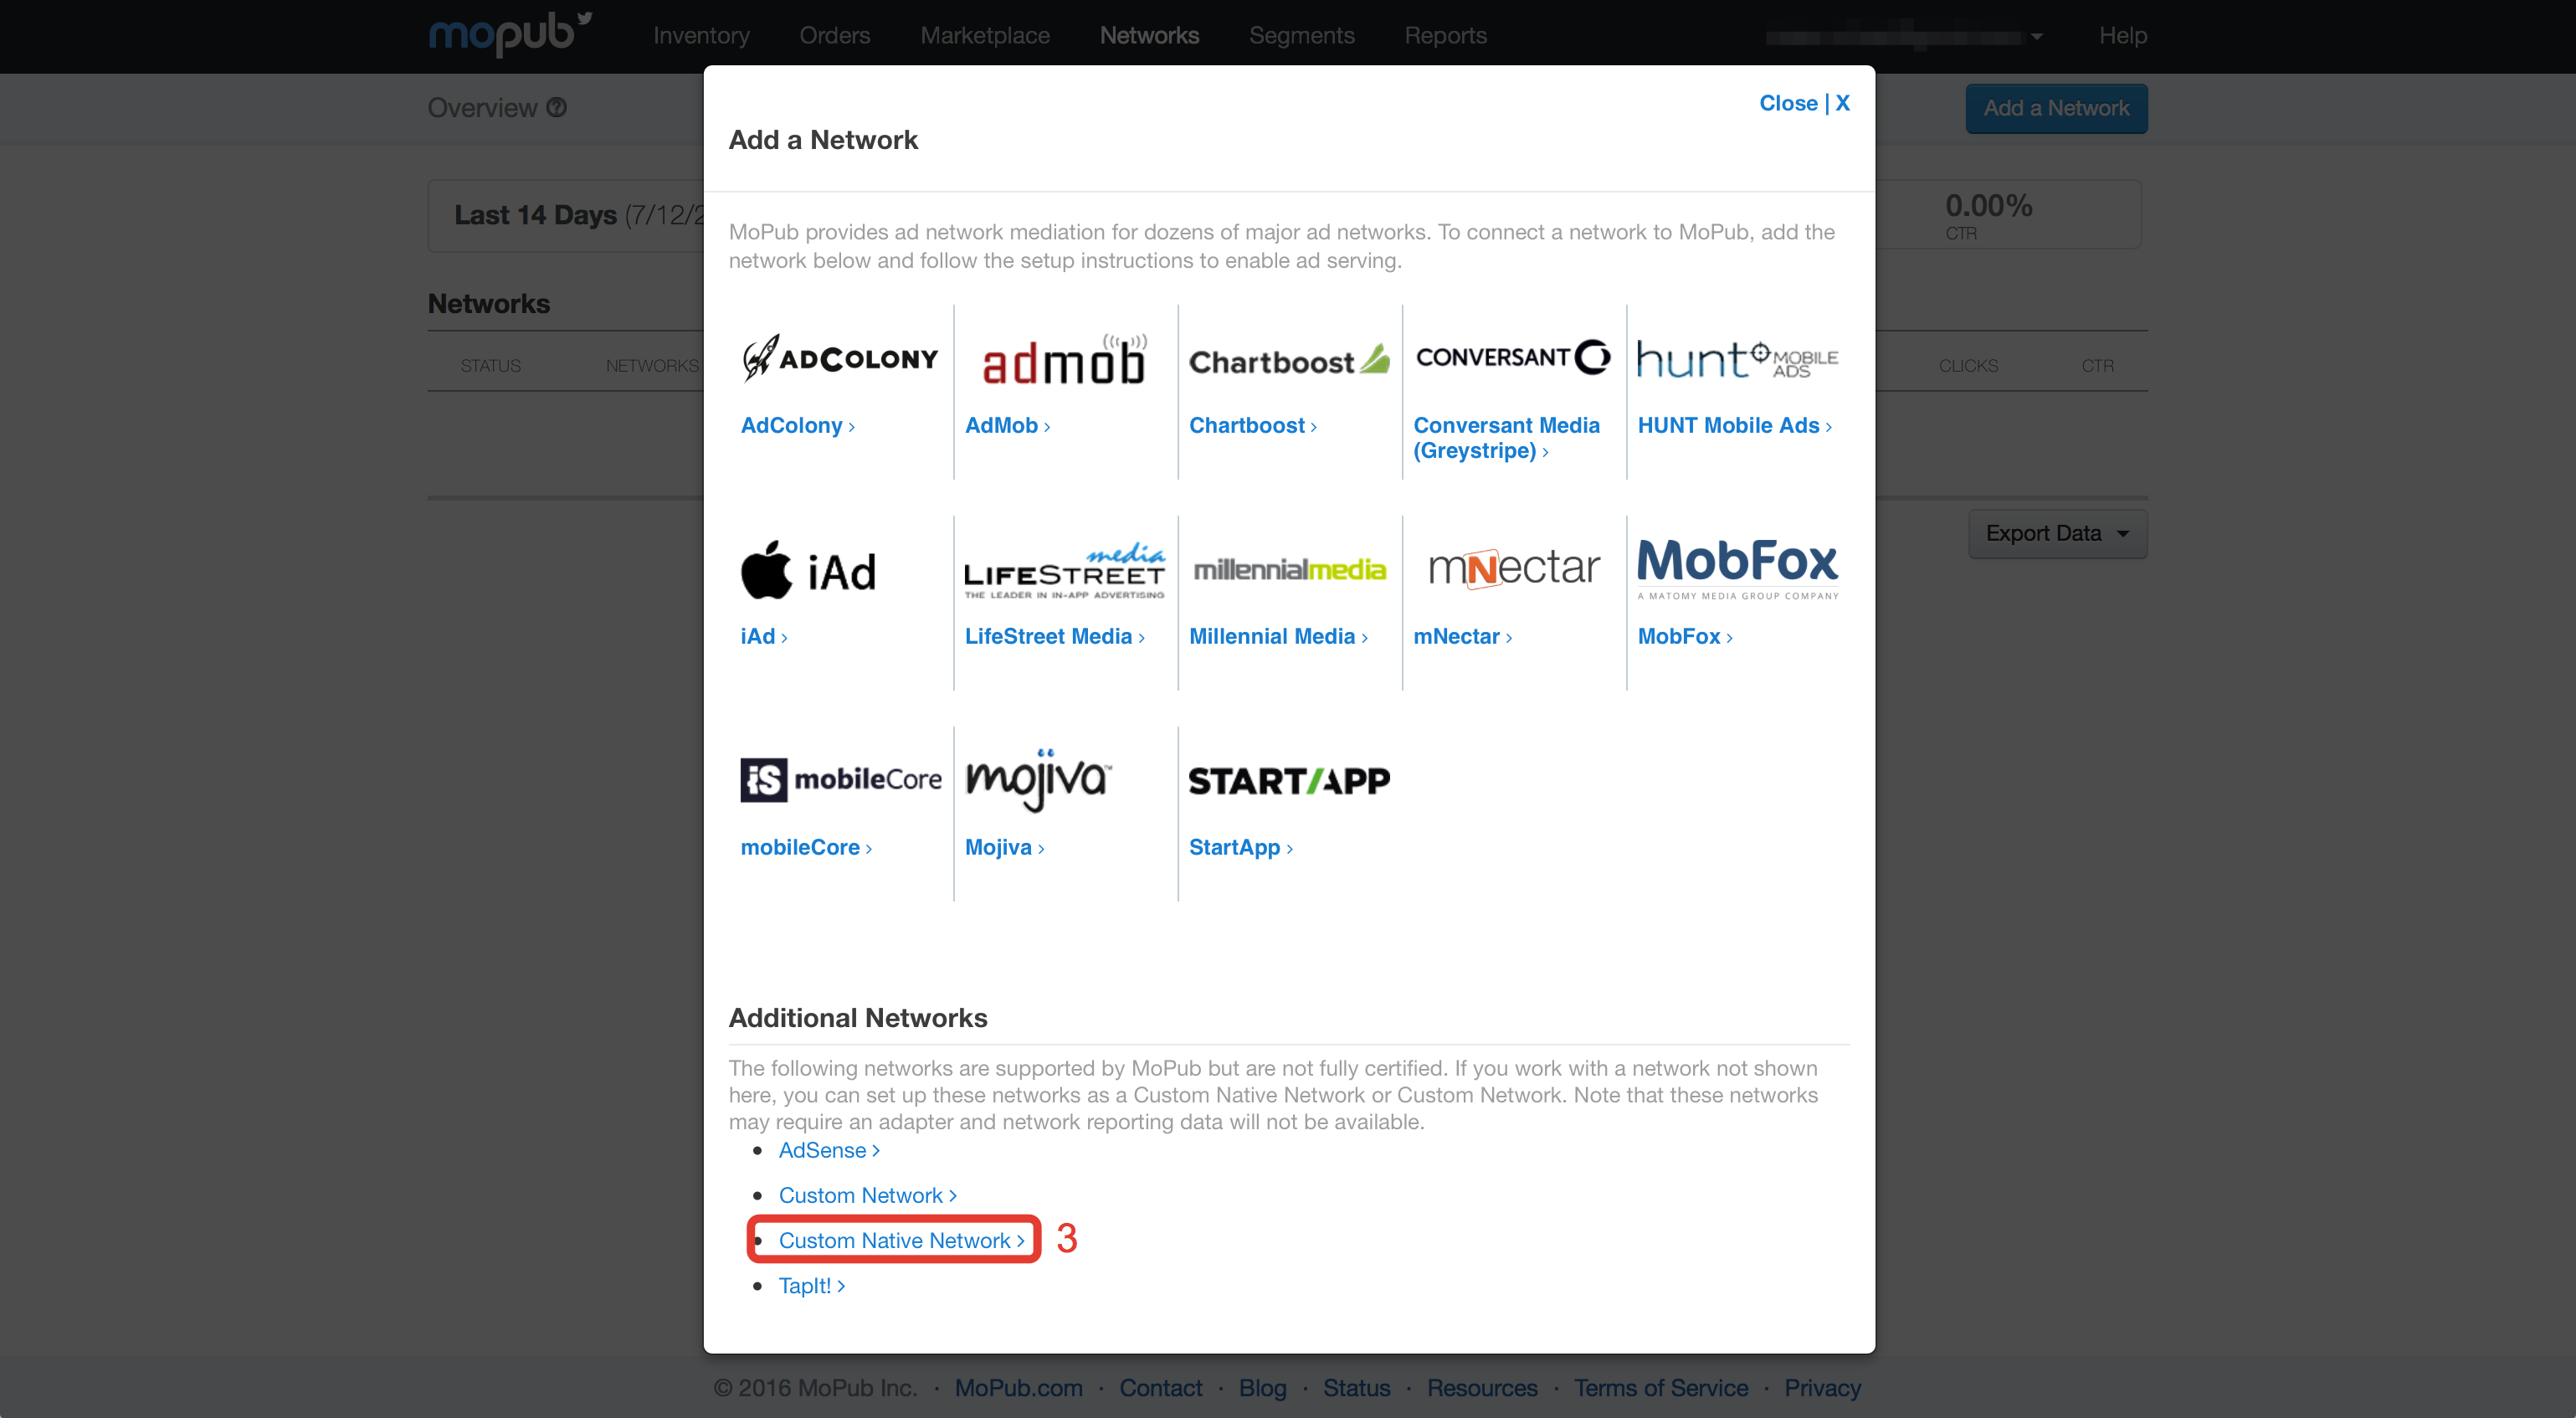
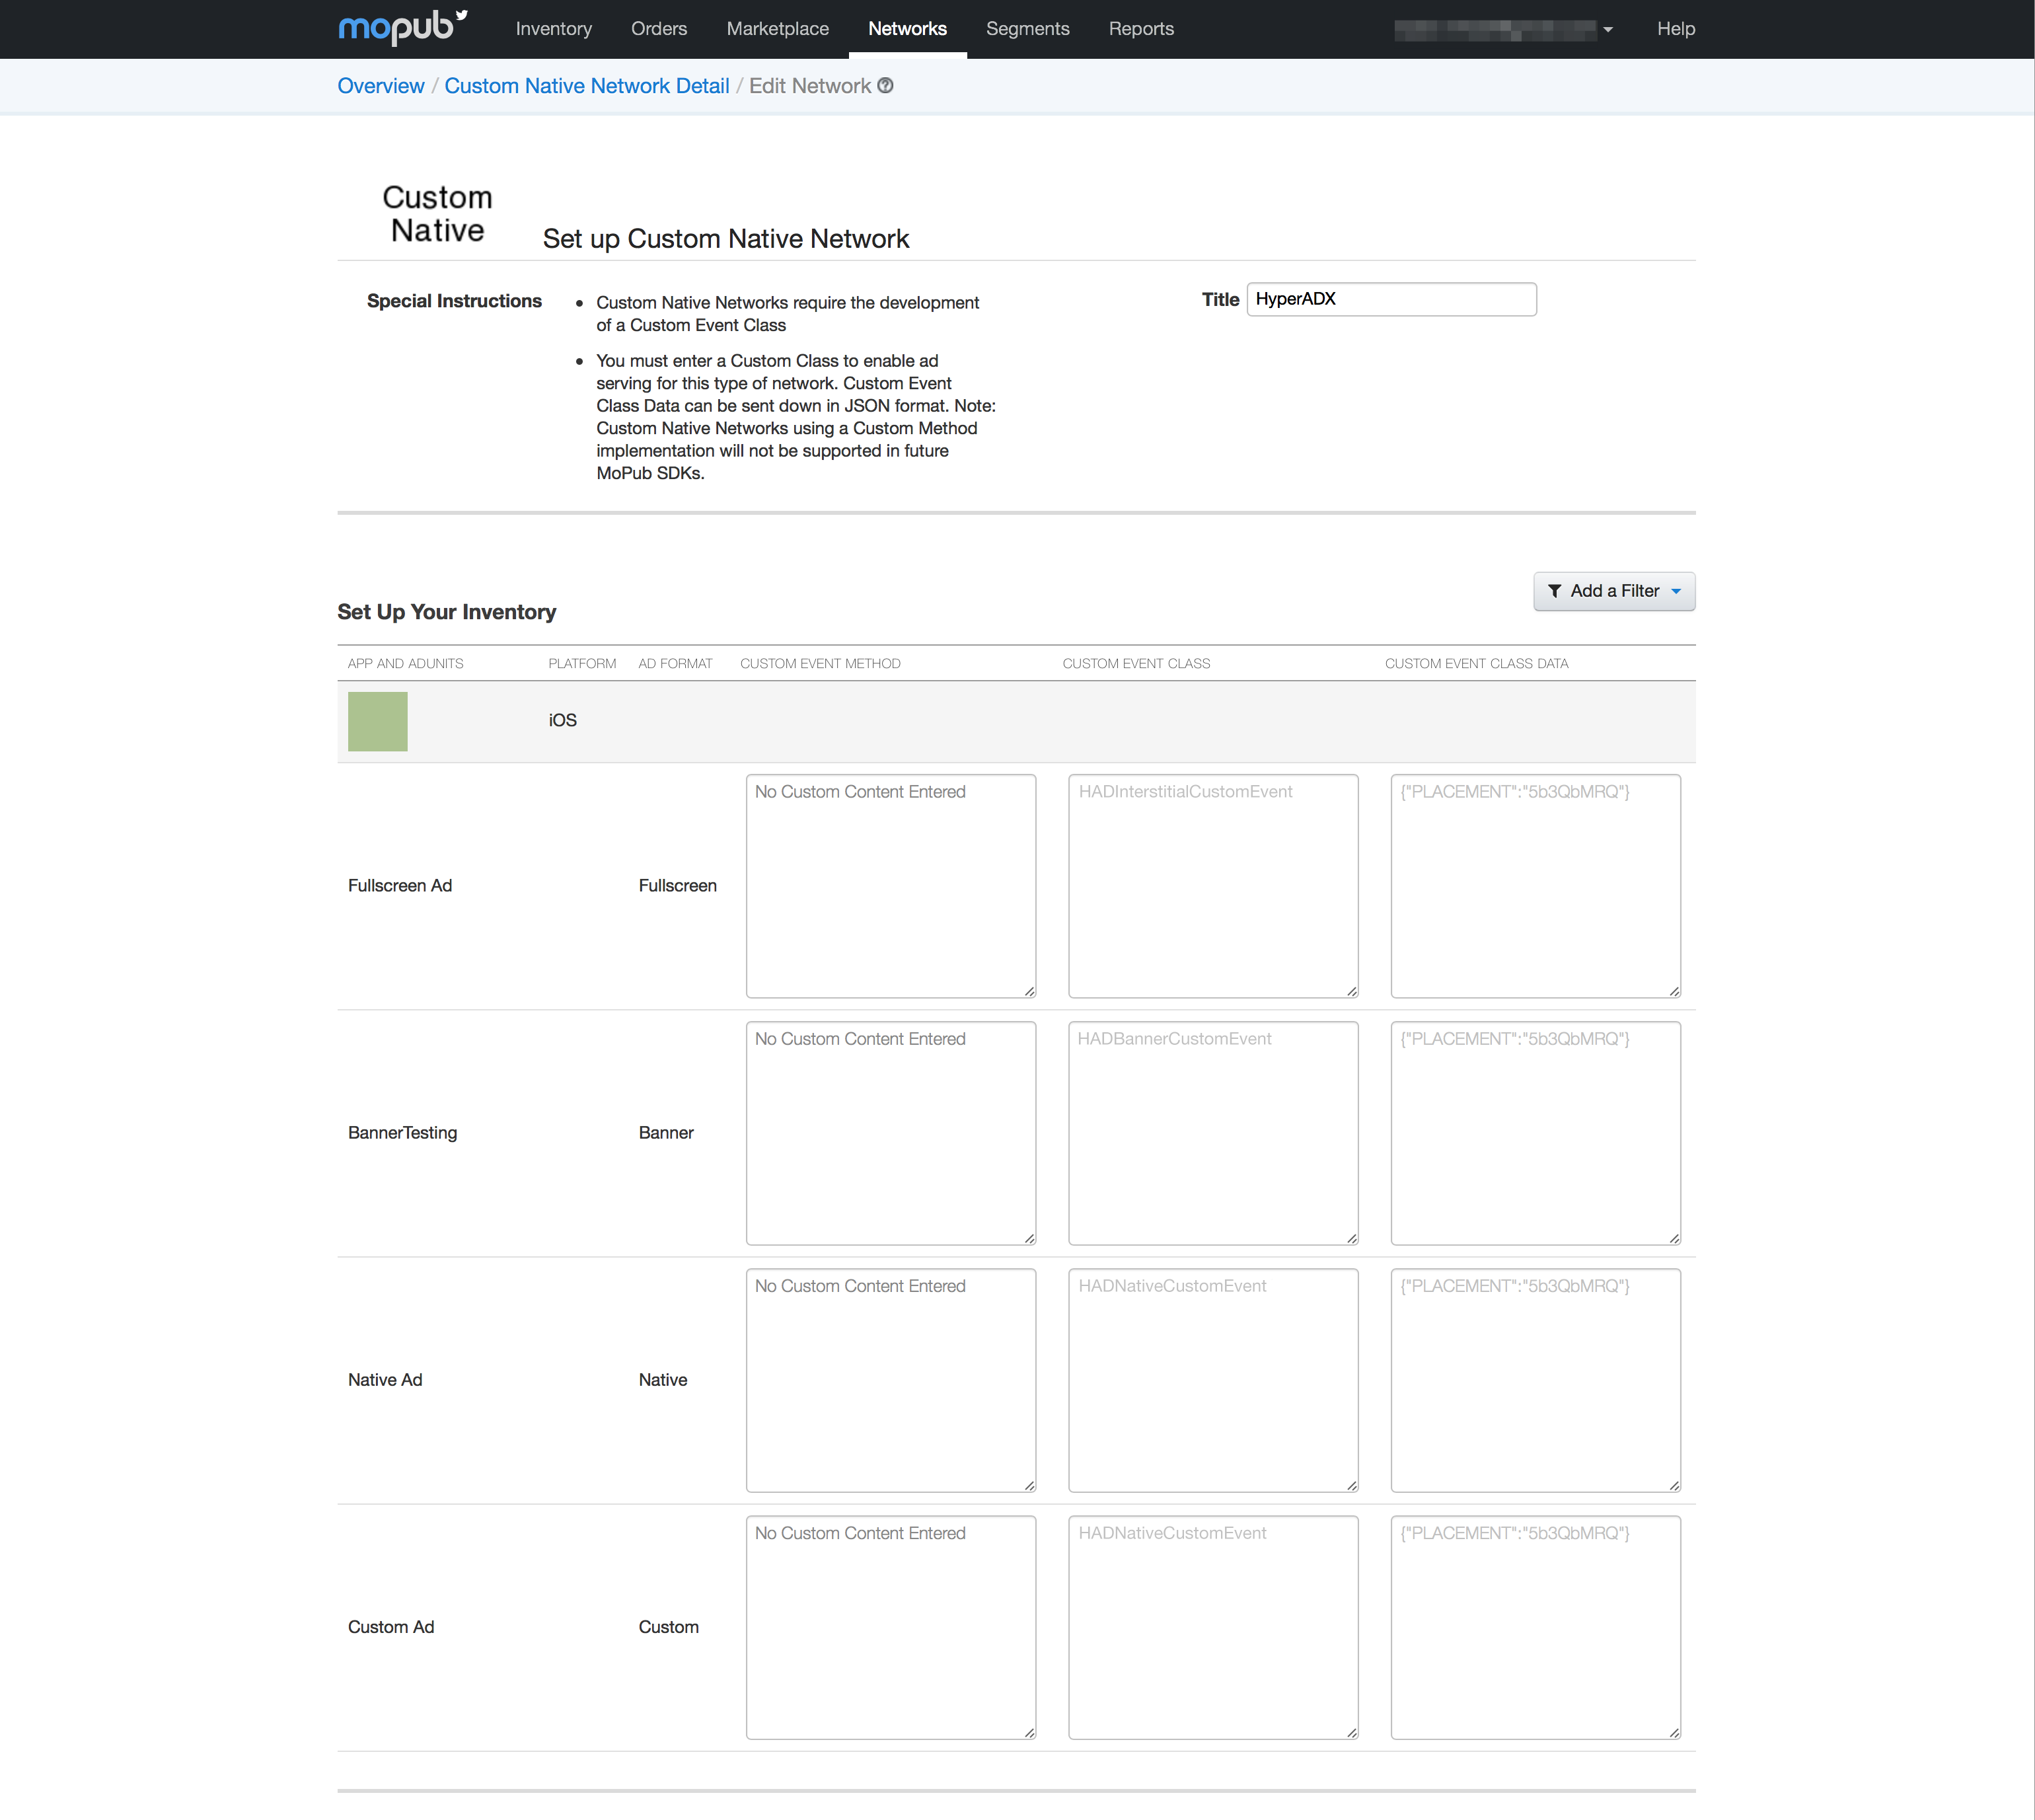
- Complete the fields accordingly to the Ad Unit that you want to use
Native ads
- Add HADNativeAdAdapter.swift and HADNativeCustomEvent.swift files
- Custom Event Class:
HADNativeCustomEvent - Custom Event Class Data:
{"PLACEMENT":"<YOUR PLACEMENT>"}
You can use the test placement 5b3QbMRQ
Add
HADNativeCustomEvent.swiftandHADNativeAdAdapter.swiftadapter files in your project Implement MoPub NativeViewController:
import HADFramework
import UIKit

class NativeViewController: UIViewController, MPNativeAdRendering, MPNativeAdDelegate {
    @IBOutlet weak var nativeView: NativeView!
    @IBOutlet weak var titleLabel: UILabel!
    @IBOutlet weak var mainTextLabel: UILabel!
    @IBOutlet weak var callToActionLabel: UILabel!
    @IBOutlet weak var iconImageView: UIImageView!
    @IBOutlet weak var mainImageView: UIImageView!

    override func viewDidLoad() {
        super.viewDidLoad()
        let settings = MPStaticNativeAdRendererSettings()
        settings.renderingViewClass = NativeView.self
        let config = MPStaticNativeAdRenderer.rendererConfigurationWithRendererSettings(settings)
        config.supportedCustomEvents = ["HADNativeCustomEvent"]
        let request = MPNativeAdRequest(adUnitIdentifier: "YOUR_AD_UNIT", rendererConfigurations: [config])
        request.startWithCompletionHandler { (request, nativeAd, error) in
            if error != nil {
                print("Loading error")
            } else {
                print("Ad loaded")
                nativeAd.delegate = self
                do {
                    let v = try nativeAd.retrieveAdView()
                    v.frame = self.view.bounds
                    self.view.addSubview(v)
                } catch let error {
                    print("ERROR: \(error)")
                }
            }
        }
    }

    //MARK: MPNativeAdRendering
    func nativeTitleTextLabel() -> UILabel! {
        return titleLabel
    }

    func nativeMainTextLabel() -> UILabel! {
        return mainTextLabel
    }

    func nativeCallToActionTextLabel() -> UILabel! {
        return callToActionLabel!
    }

    func nativeIconImageView() -> UIImageView! {
        return iconImageView
    }

    func nativeMainImageView() -> UIImageView! {
        return mainImageView
    }

    func nativeVideoView() -> UIView! {
        return UIView()
    }

    //MARK: MPNativeAdDelegate
    func viewControllerForPresentingModalView() -> UIViewController! {
        return self
    }
}
And implement MoPubNativeAdRenderer, e.g.:
class NativeView: UIView, MPNativeAdRenderer {
    //MARK: MPNativeAdRenderer
    var settings: MPNativeAdRendererSettings!

    required init!(rendererSettings: MPNativeAdRendererSettings!) {
        super.init(frame: CGRectZero)
        settings = rendererSettings
    }

    override init(frame: CGRect) {
        super.init(frame: frame)
    }

    required init?(coder aDecoder: NSCoder) {
        super.init(coder: aDecoder)
    }

    static func rendererConfigurationWithRendererSettings(rendererSettings: MPNativeAdRendererSettings!) -> MPNativeAdRendererConfiguration! {
        let settings = MPStaticNativeAdRendererSettings()
        settings.renderingViewClass = NativeView.self
        let config = MPNativeAdRendererConfiguration()
        config.rendererSettings = settings
        config.supportedCustomEvents = ["NativeView"]
        return config
    }

    func retrieveViewWithAdapter(adapter: MPNativeAdAdapter!) throws -> UIView {
        return UIView()
    }
}
Interstitial
- Custom Event Class:
HADInterstitialCustomEvent - Custom Event Class Data:
{"PLACEMENT":"<YOUR PLACEMENT>"}
You can use the test placement 5b3QbMRQ
Add
HADInterstitialCustomEvent.swiftadapter in your project. Implement MoPub Interstitial:
import HADFramework
import UIKit

class ViewController: UIViewController, MPInterstitialAdControllerDelegate {
    var interstitial: MPInterstitialAdController!

    override func viewDidLoad() {
        super.viewDidLoad()
        //Interstitial
        interstitial = MPInterstitialAdController(forAdUnitId: "YOUR_AD_UNIT")
        interstitial.delegate = self
        interstitial.loadAd()
    }

    //MARK: MPInterstitialAdControllerDelegate
    func interstitialDidLoadAd(interstitial: MPInterstitialAdController!) {
        print("interstitialDidLoadAd")
        interstitial.showFromViewController(self)
    }

    func interstitialDidFailToLoadAd(inter: MPInterstitialAdController!) {
        print("interstitialDidFailToLoadAd")
        interstitial = MPInterstitialAdController(forAdUnitId: "5b0f8ff979a840b4928ca7fd14ec82e7")
        interstitial.delegate = self
        interstitial.loadAd()
    }
}
Banner
Custom Event Class: HADBannerCustomEvent
Custom Event Class Data: {"PLACEMENT":"<YOUR PLACEMENT>"}
You can use the test placement 5b3QbMRQ
Add
HADBannerCustomEvent.swiftadapter in your project Implement MoPub Banner:
import HADFramework
import UIKit

class ViewController: UIViewController, MPAdViewDelegate {
    override func viewDidLoad() {
        super.viewDidLoad()
        //Banner 320x50
        let m = MPAdView(adUnitId: "YOUR_AD_UNIT", size: CGSizeMake(320, 50))
        m.delegate = self
        m.frame = CGRectMake((UIScreen.mainScreen().bounds.width-320)/2, 100, 320, 50)
        view.addSubview(m)
        m.loadAd()
    }

    //MARK: MPAdViewDelegate
    func viewControllerForPresentingModalView() -> UIViewController! {
        return self
    }

    func adViewDidLoadAd(view: MPAdView!) {
        print("adViewDidLoadAd")
    }

    func adViewDidFailToLoadAd(view: MPAdView!) {
        print("adViewDidFailToLoadAd")
    }

    func didDismissModalViewForAd(view: MPAdView!) {
        print("didDismissModalViewForAd")
    }

    func willPresentModalViewForAd(view: MPAdView!) {
        print("willPresentModalViewForAd")
    }

    func willLeaveApplicationFromAd(view: MPAdView!) {
        print("willLeaveApplicationFromAd")
    }
}
Android
- Download and extract the Mopub adapter if needed.
You can use Hyperadx as a Network in Mopub’s Mediation platform. Setup SDKs
- Integrate with Mopub SDK
- Install Hyperadx SDK
Setup Mopub Dashboard
- Create an “Hyperadx” Network in Mopub’s dashboard and connect it to your Ad Units.
- In Mopub’s dashboard select Networks > Add New network
Then select Custom Native Network. Complete the fields accordingly to the Ad Unit that you want to use
Native
- Custom Event Class:
com.mopub.nativeads.HyperadxNativeMopub - Custom Event Class Data:
{"PLACEMENT":"<YOUR PLACEMENT>"}
You can use the test placement “5b3QbMRQ”
Add adapter in your project. Create package “com.mopub.nativeads” in your project and put this class in there:
HyperadxNativeMopub.java:

package com.mopub.nativeads;
import android.app.Activity;
import android.os.AsyncTask;
import android.support.annotation.NonNull;
import android.util.Log;
import android.view.View;
import com.hyperadx.lib.sdk.nativeads.Ad;
import com.hyperadx.lib.sdk.nativeads.AdListener;
import com.hyperadx.lib.sdk.nativeads.HADNativeAd;
import java.io.IOException;
import java.net.HttpURLConnection;
import java.net.MalformedURLException;
import java.net.URL;
import java.util.HashSet;
import java.util.Map;
import java.util.Set;

public class HyperadxNativeMopub extends CustomEventNative {
    private static final String PLACEMENT_KEY = "PLACEMENT";
    com.hyperadx.lib.sdk.nativeads.HADNativeAd nativeAd;

    @Override
    protected void loadNativeAd(final @NonNull Activity activity, final @NonNull CustomEventNativeListener customEventNativeListener, @NonNull Map<String, Object> localExtras, @NonNull Map<String, String> serverExtras) {
        final String placement;
        if ((serverExtras != null) && serverExtras.containsKey(PLACEMENT_KEY)) {
            placement = serverExtras.get(PLACEMENT_KEY);
 } else {
            customEventNativeListener.onNativeAdFailed(NativeErrorCode.NATIVE_ADAPTER_CONFIGURATION_ERROR);
            return;
        }

        nativeAd = new com.hyperadx.lib.sdk.nativeads.HADNativeAd(activity, placement); //Native AD constructor
        nativeAd.setContent("title,icon,description");
        nativeAd.setAdListener(new AdListener() { // Add Listeners
            @Override
            public void onAdLoaded(Ad ad) {
                customEventNativeListener.onNativeAdLoaded(new HyperadxNativeAd(ad, nativeAd, activity));

            @Override
            public void onError(Ad nativeAd, String error) { // Called when load is fail
                customEventNativeListener.onNativeAdFailed(NativeErrorCode.EMPTY_AD_RESPONSE);
            }

            @Override
            public void onAdClicked() { // Called when user click on AD
                Log.wtf("TAG", "AD Clicked");
            }
        });
        nativeAd.loadAd();


    class HyperadxNativeAd extends StaticNativeAd {
        final Ad hadModel;
        final com.hyperadx.lib.sdk.nativeads.HADNativeAd nativeAd;
        final ImpressionTracker impressionTracker;
        final NativeClickHandler nativeClickHandler;
        final Activity activity;
        public HyperadxNativeAd(@NonNull Ad customModel, HADNativeAd nativeAd, Activity activity) {

            hadModel = customModel;
            this.nativeAd = nativeAd;
            this.activity = activity;
            impressionTracker = new ImpressionTracker(activity);
            nativeClickHandler = new NativeClickHandler(activity);
            setIconImageUrl(hadModel.getIcon_url());
            setMainImageUrl(hadModel.getImage_url());
            setTitle(hadModel.getTitle());
            setText(hadModel.getDescription());
            setClickDestinationUrl(hadModel.getClickUrl());
            for (Ad.Tracker tracker : hadModel.getTrackers())
                if (tracker.getType().equals("impression")) {
                    addImpressionTracker(tracker.getUrl());
                }

        @Override
        public void prepare(final View view) {
            impressionTracker.addView(view, this);
            nativeClickHandler.setOnClickListener(view, this);
        }

        @Override
        public void recordImpression(final View view) {
            notifyAdImpressed();
            for (Ad.Tracker tracker : hadModel.getTrackers())
                if (tracker.getType().equals("impression")) {
                    new LoadUrlTask().execute(tracker.getUrl());
                }

        @Override
        public void handleClick(final View view) {
            notifyAdClicked();
            nativeClickHandler.openClickDestinationUrl(getClickDestinationUrl(), view);
            if (hadModel.getClickUrl() != null)
                new LoadUrlTask().execute(hadModel.getClickUrl());
        }

        private class LoadUrlTask extends AsyncTask<String, Void, String> {
            String userAgent;
            public LoadUrlTask() {
                userAgent = com.hyperadx.lib.sdk.Util.getDefaultUserAgentString(activity);

            @Override
            protected String doInBackground(String... urls) {
                String loadingUrl = urls[0];
                URL url = null;
                try {
                    url = new URL(loadingUrl);
                } catch (MalformedURLException e) {
                    return (loadingUrl != null) ? loadingUrl : "";
                }
                com.hyperadx.lib.sdk.HADLog.d("Checking URL redirect:" + loadingUrl);
                int statusCode = -1;
                HttpURLConnection connection = null;
                String nextLocation = url.toString();
                Set<String> redirectLocations = new HashSet<String>();
                redirectLocations.add(nextLocation);
                try {
                    do {
                        connection = (HttpURLConnection) url.openConnection();
                        connection.setRequestProperty("User-Agent",
                                userAgent);
                        connection.setInstanceFollowRedirects(false);
                        statusCode = connection.getResponseCode();
                        if (statusCode == HttpURLConnection.HTTP_OK) {
                            connection.disconnect();
                            break;
                        } else {
                            nextLocation = connection.getHeaderField("location");
                            connection.disconnect();
                            if (!redirectLocations.add(nextLocation)) {
                                com.hyperadx.lib.sdk.HADLog.d("URL redirect cycle detected");
                                return "";
                            }
                            url = new URL(nextLocation);
                        }
                    }

                    while (statusCode == HttpURLConnection.HTTP_MOVED_TEMP || statusCode == HttpURLConnection.HTTP_MOVED_PERM
                            || statusCode == HttpURLConnection.HTTP_UNAVAILABLE
                            || statusCode == HttpURLConnection.HTTP_SEE_OTHER);
                } catch (IOException e) {
                    return (nextLocation != null) ? nextLocation : "";
                } finally {
                    if (connection != null)
                        connection.disconnect();
                }
                return nextLocation;

            @Override
            protected void onPostExecute(String url) {
            }
        }
    }
}
Interstitial
Custom Event Class: com.mopub.mobileads.HyperadxInterstitialMopub
Custom Event Class Data: {"PLACEMENT":"<YOUR PLACEMENT>"}
You can use the test placement 5b3QbMRQ
Add adapter in your project Create package “com.mopub.mobileads” in your project and put this class in there:
HyperadxInterstitialMopub.java:

package com.mopub.mobileads;
import android.content.Context;
import android.util.Log;
import com.hyperadx.lib.sdk.interstitialads.HADInterstitialAd;
import com.hyperadx.lib.sdk.interstitialads.InterstitialAdListener;
import java.util.Map;

public class HyperadxInterstitialMopub extends CustomEventInterstitial {
    private static final String PLACEMENT_KEY = "PLACEMENT";
    private HADInterstitialAd interstitialAd;
    private com.hyperadx.lib.sdk.interstitialads.Ad iAd = null;
    CustomEventInterstitialListener customEventInterstitialListener;

    @Override
    protected void loadInterstitial(final Context context, final CustomEventInterstitialListener customEventInterstitialListener, Map<String, Object> localExtras, Map<String, String> serverExtras) {
        final String placement;
        final String appId;
        if (serverExtras != null && serverExtras.containsKey(PLACEMENT_KEY)) {
            placement = serverExtras.get(PLACEMENT_KEY);

 } else {
            customEventInterstitialListener.onInterstitialFailed(MoPubErrorCode.ADAPTER_CONFIGURATION_ERROR);
            return;
        }

        interstitialAd = new HADInterstitialAd(context, placement); //Interstitial AD constructor
        interstitialAd.setAdListener(new InterstitialAdListener() { // Set Listener
            @Override
            public void onAdLoaded(com.hyperadx.lib.sdk.interstitialads.Ad ad) { // Called when AD is Loaded
                iAd = ad;
                //   Toast.makeText(context, "Interstitial Ad loaded", Toast.LENGTH_SHORT).show();
                customEventInterstitialListener.onInterstitialLoaded();
            }

            @Override
            public void onError(com.hyperadx.lib.sdk.interstitialads.Ad Ad, String error) { // Called when load is fail
                //   Toast.makeText(context, "Interstitial Ad failed to load with error: " + error, Toast.LENGTH_SHORT).show();
                customEventInterstitialListener.onInterstitialFailed(MoPubErrorCode.UNSPECIFIED);

            @Override
            public void onInterstitialDisplayed() { // Called when Ad was impressed
                //    Toast.makeText(context, "Tracked Interstitial Ad impression", Toast.LENGTH_SHORT).show();
                customEventInterstitialListener.onInterstitialShown();
            }

            @Override
            public void onInterstitialDismissed(com.hyperadx.lib.sdk.interstitialads.Ad ad) { // Called when Ad was dissnissed by user
                //   Toast.makeText(context, "Interstitial Ad Dismissed", Toast.LENGTH_SHORT).show();
                customEventInterstitialListener.onInterstitialDismissed();

            @Override
            public void onAdClicked() { // Called when user click on AD
                //   Toast.makeText(context, "Tracked Interstitial Ad click", Toast.LENGTH_SHORT).show();
                customEventInterstitialListener.onInterstitialClicked();
            }
        });

        this.customEventInterstitialListener = customEventInterstitialListener;
        interstitialAd.loadAd(); // Call to load AD

    @Override
    protected void showInterstitial() {
        if (iAd != null)
            HADInterstitialAd.show(iAd); // Call to show AD
        else
            Log.e("HADInterstitialMopub", "The Interstitial AD not ready yet. Try again!");
    }

    @Override
    protected void onInvalidate() {
    }
}
This is your adapter. Now you can use Mopub as usual.
Admob adapter
iOS
Download and extract the HADFramework for iOS.
You can find Admob adapter example in HyperadxiOSADs_Sample_VERSION/Mediation Adapters/AdMob/.
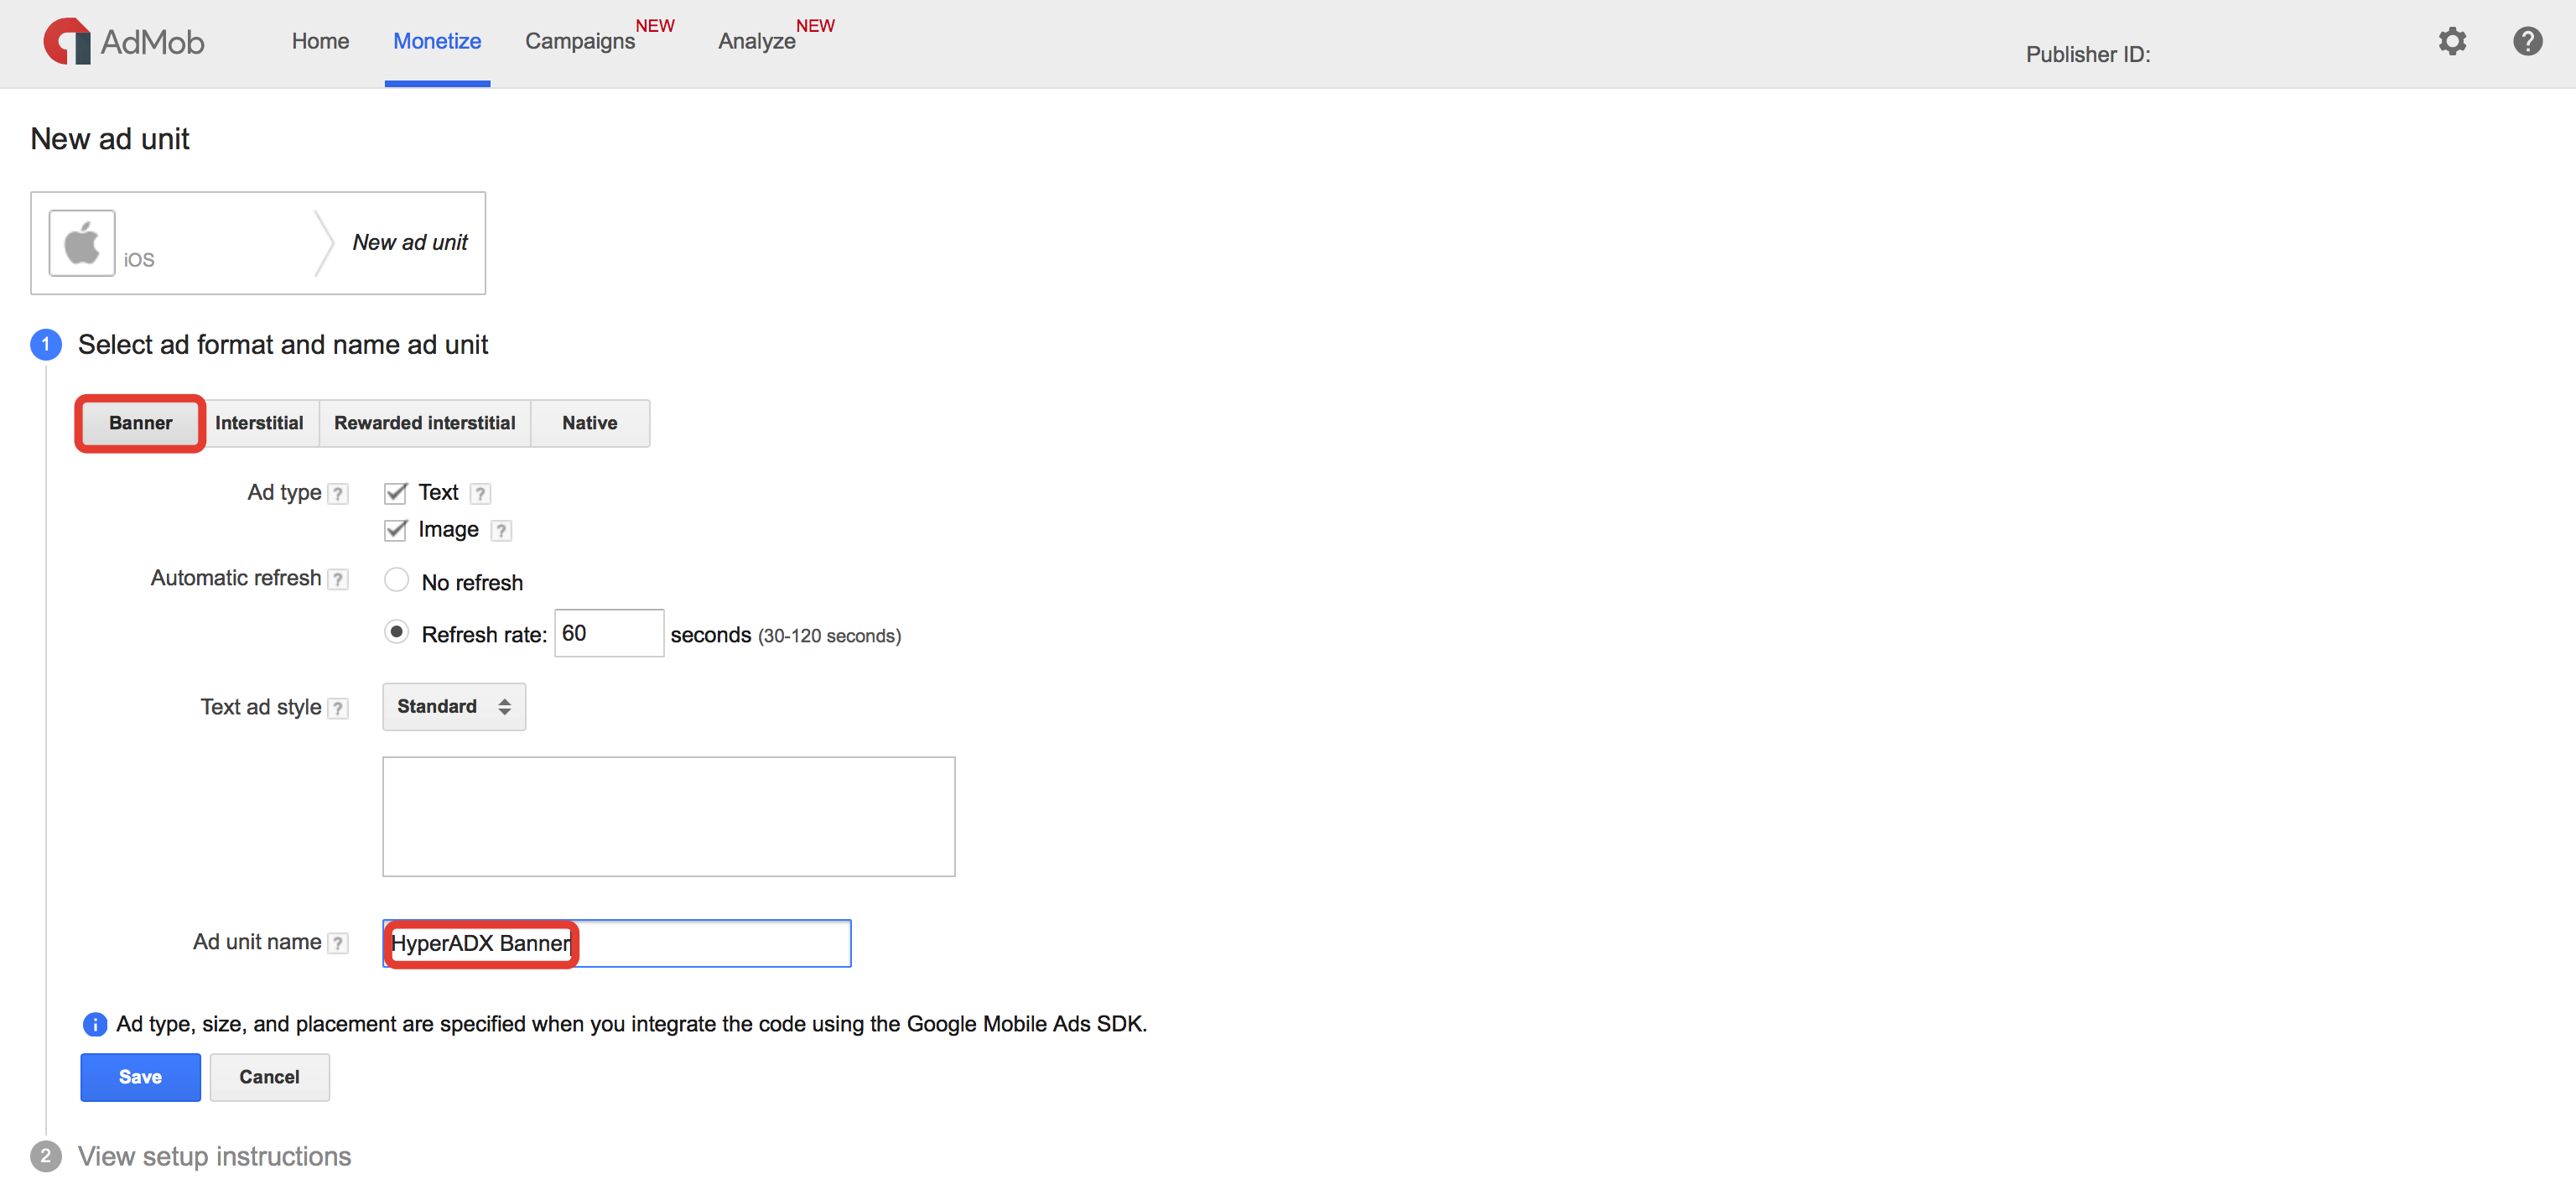
First of all you need to add new app in AdMob console.
You will get UnitId string like ‘ca-app-pub-+++++++++++++/+++++++++++++’. For the next few hours you may get the AdMob errors with codes 0 or 2. Just be patient.
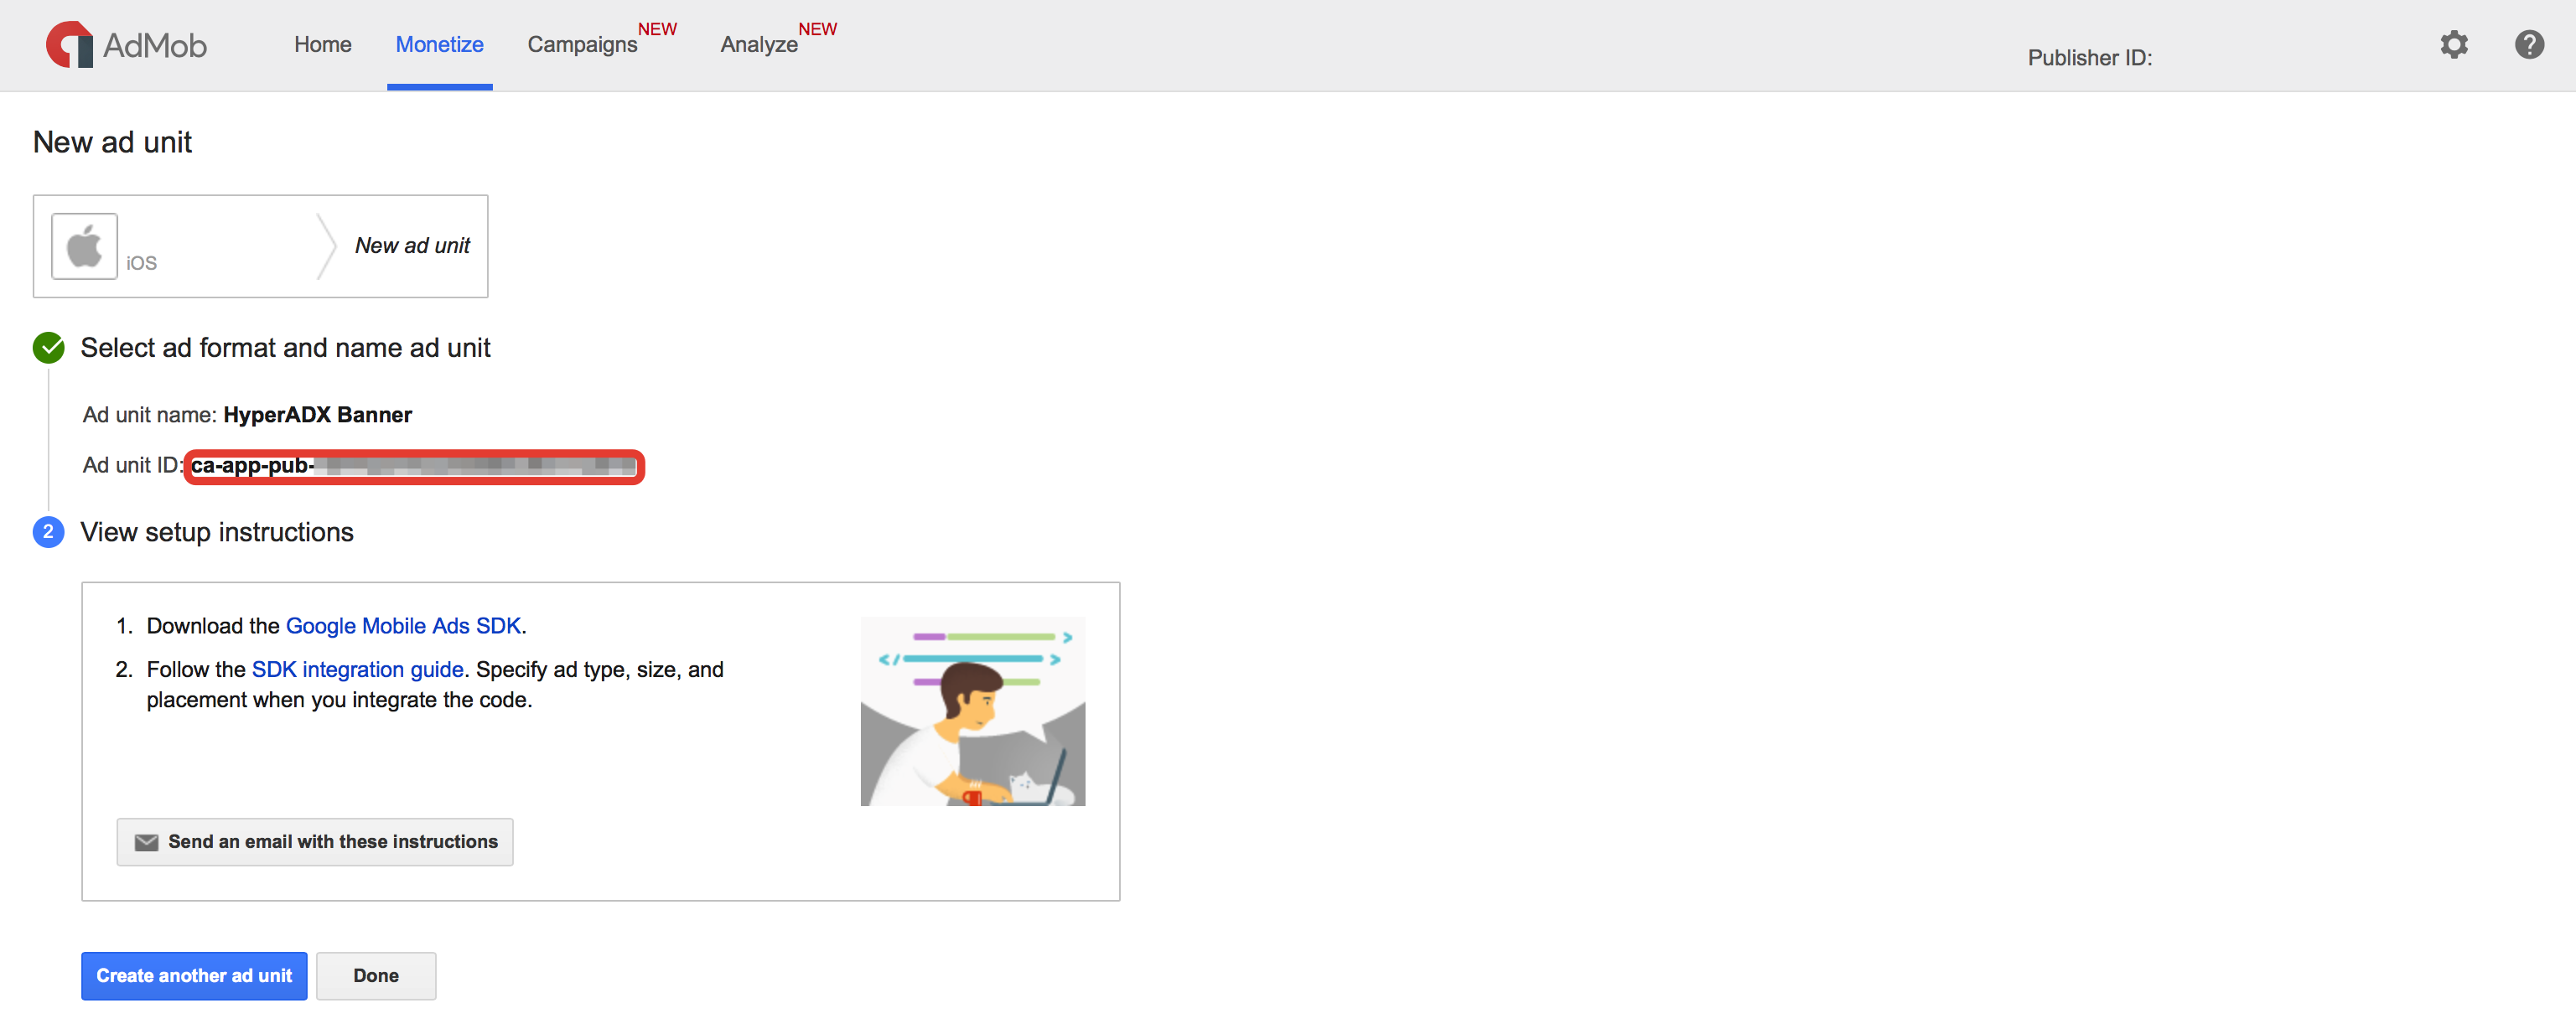
- Then you need to add new mediation source.
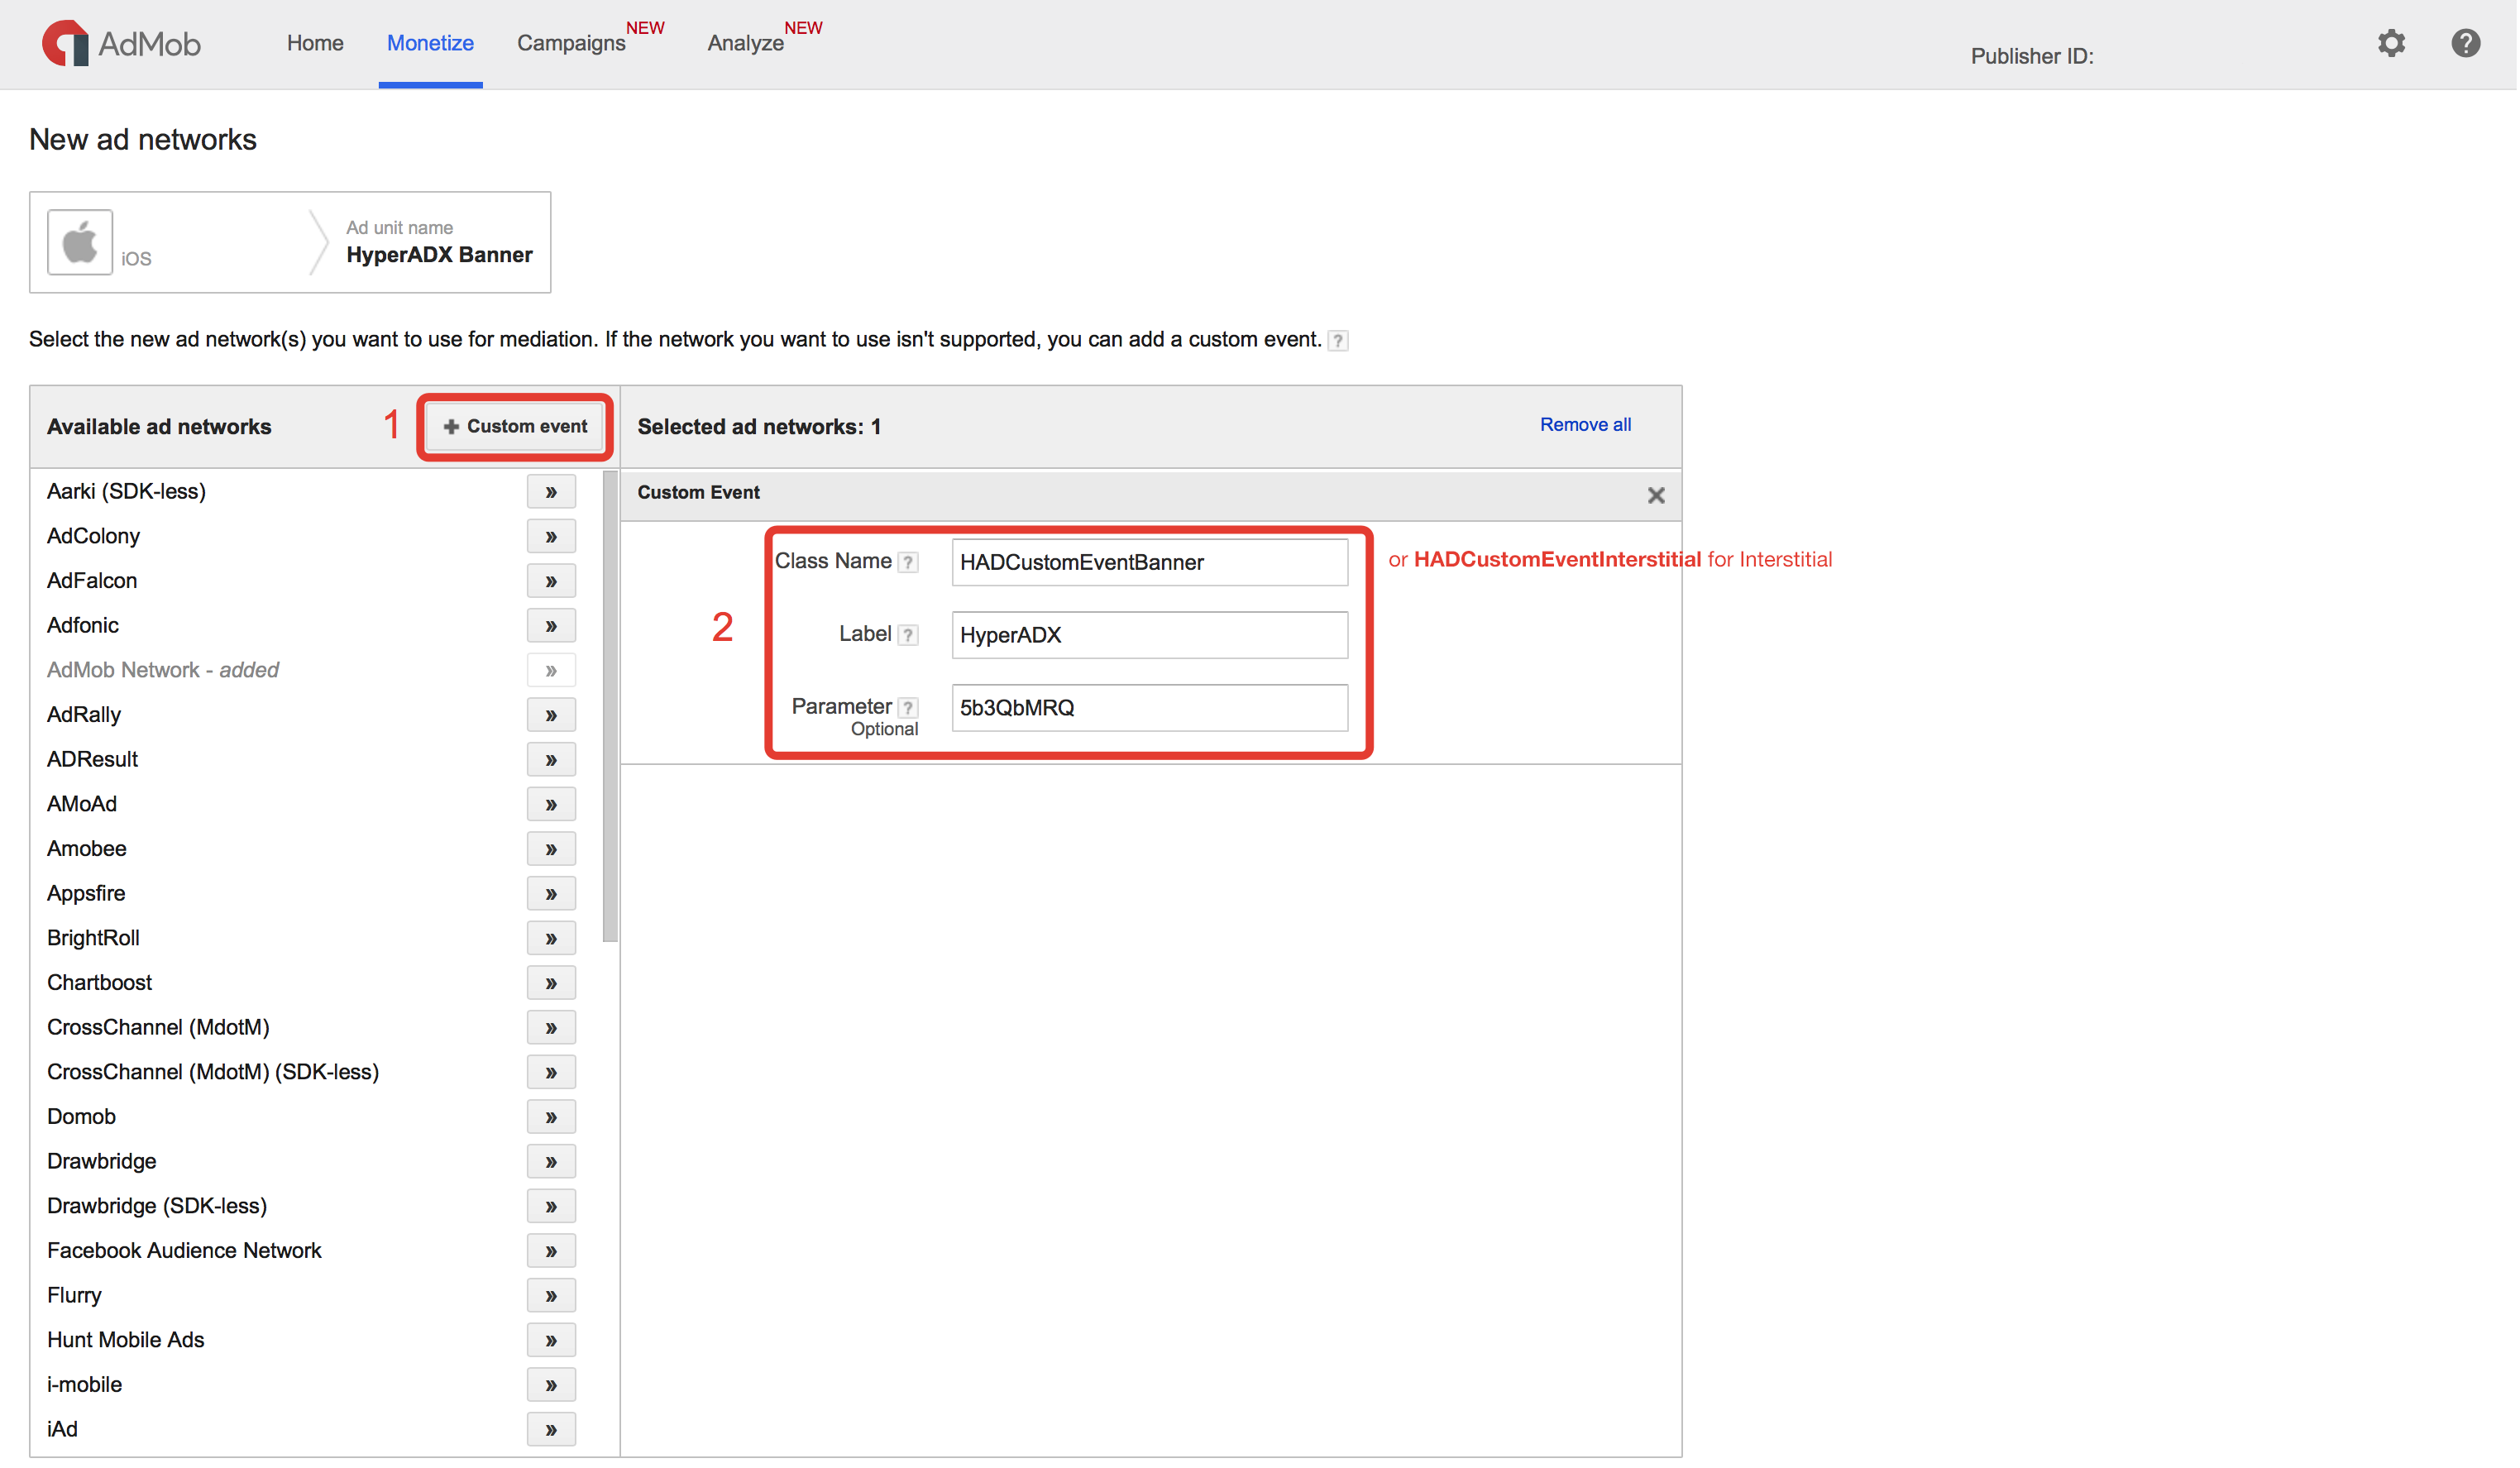
Banner
Fill
Class Namefield with aHADCustomEventBanner. And aParameterwith your HyperAdx statement string.Setup eCPM for new network
Now you can setting up your Xcode project.
- Put HyperAdx-SDK as described above
- Add HADCustomEventBanner.swift file
NOTE - In the Objective-C only project you must create swift header file as described here
Just create AdMob banner Ad as usually:
import GoogleMobileAds
import HADFramework
import UIKit

class ViewController: UIViewController, GADBannerViewDelegate {
    var bannerView: GADBannerView!

    override func viewDidLoad() {
        super.viewDidLoad()
        let request = GADRequest()
        //Banner 320x50
        bannerView = GADBannerView(adSize: GADAdSize.init(size: CGSizeMake(320, 50), flags: 0))
        bannerView.frame.origin.x = (UIScreen.mainScreen().bounds.width-320)/2
        bannerView.frame.origin.y = 100
        bannerView.adUnitID = "YOUR_ADUNIT_ID"
        bannerView.rootViewController = self
        bannerView.delegate = self
        view.addSubview(bannerView)
        bannerView.loadRequest(request)
    }

    //MARK: GADBannerViewDelegate
    func adViewDidReceiveAd(bannerView: GADBannerView!) {
        print("adViewDidReceiveAd")
    }

    func adView(bannerView: GADBannerView!, didFailToReceiveAdWithError error: GADRequestError!) {
        print("didFailToReceiveAdWithError: \(error)")
    }
}
Interstitial
Fill
Class Namefield with aHADCustomEventInterstitial. And aParameterwith your HyperAdx statement string.Setup eCPM for new network
Now you can setting up your Xcode project.
- Put HyperAdx-SDK as described above
- Add HADCustomEventInterstitial.swift file
NOTE - In the Objective-C only project you must create swift header file as described here
Just create AdMob interstitial Ad as usually:
import GoogleMobileAds
import HADFramework
import UIKit

class ViewController: UIViewController, GADInterstitialDelegate {
    var interstitial: GADInterstitial!

    override func viewDidLoad() {
        super.viewDidLoad()
        let request = GADRequest()
        //Interstitial
        interstitial = GADInterstitial(adUnitID: "YOUR_ADUNIT_ID")
        interstitial.delegate = self
        interstitial.loadRequest(request)
    }

    @IBAction func createAndLoadInterstitial() {
        if interstitial.isReady {
            interstitial.presentFromRootViewController(self)
        } else {
            print("Ad wasn't ready")
        }
    }

    //MARK: GADInterstitialDelegate
    func interstitialDidReceiveAd(ad: GADInterstitial!) {
        print("interstitialDidReceiveAd")
    }

    func interstitial(ad: GADInterstitial!, didFailToReceiveAdWithError error: GADRequestError!) {
        print("interstitial didFailToReceiveAdWithError: \(error)")
    }
}
Android
Download and extract the AdMob adapter if needed.
First of all you need to add new app in AdMob console.
You will get UnitId string like 'ca-app-pub-**********/**********’. For the next few hours you may get the AdMob errors with codes 0 or 2. Just be patient.
Then you need to add new mediation source.
Interstitial
Fill
Class Namefield with acom.hyperadx.admob.HADInterstitialEventstring. And aParameterwith your HyperAdx statement string.Setup eCPM for new network
Now you can setting up your android project.
- Put HyperAdx-SDK and AdMob-adapter in 'libs’ folder.
- Add those lines in your
build.gradlefile:
NOTE - Admob interstitial may not work in emulator. Use real devices even for tests!
dependencies {
    compile fileTree(dir: 'libs', include: ['*.jar'])
    compile 'com.android.support:appcompat-v7:23.4.0'
    compile 'com.google.android.gms:play-services-ads:9.0.2'
    compile 'com.google.android.gms:play-services-base:9.0.2'
}
Just create AdMob interstitial Ad as usually:
package com.hyperadx.admob_sample;
import android.os.Bundle;
import android.support.v7.app.AppCompatActivity;
import android.view.View;
import android.widget.Toast;
import com.google.android.gms.ads.AdRequest;
public class MainActivity extends AppCompatActivity {
    private com.google.android.gms.ads.InterstitialAd mAdapterInterstitial;
    @Override
    protected void onCreate(Bundle savedInstanceState) {
        super.onCreate(savedInstanceState);
        setContentView(R.layout.activity_main);
        loadInterstitialAd();
    }

    private void loadInterstitialAd() {
        mAdapterInterstitial = new com.google.android.gms.ads.InterstitialAd(this);
        mAdapterInterstitial.setAdUnitId(
                "ca-app-pub-6172762133617463/5529648238"
        );

        mAdapterInterstitial.setAdListener(new com.google.android.gms.ads.AdListener() {
            @Override
            public void onAdFailedToLoad(int errorCode) {
                Toast.makeText(MainActivity.this,
                        "Error loading adapter interstitial, code " + errorCode,
                        Toast.LENGTH_SHORT).show();
            }

            @Override
            public void onAdLoaded() {
                Toast.makeText(MainActivity.this,
                        "onAdLoaded()",
                        Toast.LENGTH_SHORT).show();
            }

            @Override
            public void onAdOpened() {
            }

            @Override
            public void onAdClosed() {
                mAdapterInterstitial.loadAd(new AdRequest.Builder().build());
            }
        });

        mAdapterInterstitial.loadAd(new AdRequest.Builder().build());
    }


    public void showInterstitial(View view) {
        if (mAdapterInterstitial.isLoaded())
            mAdapterInterstitial.show();
        else
            Toast.makeText(this, "The Interstitial AD not ready yet. Try again!", Toast.LENGTH_LONG).show();
    }
}
Tools
Link rotator
With link rotator you can easily rotate most performing offers and redirect user to it
http://ad.dispply.com/v2/link/PLACEMENT_ID
Traffic distribution system (TDS)
You can easily customize traffic distribution across different rules
Changelog
iOS
- v2.0.2 Minor fixes with Interstitial WebView
Android
v1.6.7 Minor fixes with Interstitial WebView
v1.6.6 Allow to register custom view for event listening
nativeAd.registerViewForInteraction(ad, view)